
Patches for clothing and accessories have moved beyond simple repairs and novelty embellishments, becoming intentional design choices that reflect personality. Today, patches are a powerful, affordable way to express personal style, extend the life of garments, and create one-of-a-kind items that tell a story about your interests, travels, and memories. This guide helps you learn how to apply patches for different fabrics and finishes across casual and formal garments, offering practical steps, safety tips, and troubleshooting insights to ensure a secure bond. If you’re curious about customization, explore patch customization ideas that let you mix motifs, colors, textures, and backings—from embroidered badges to vinyl accents—so you express your style with authentic flair. From quick on-the-go updates to durable applications, this introductory piece sets you up for successful patch projects.
Beyond patches, the concept expands into fabric embellishments that transform jackets, bags, and hats into personal canvases. Think of decorative badges, embroidery accents, and textile adornments as the broader family of garment embellishments that share the same design intent. Using LSI-friendly terms such as fabric accents, stitched patches, and wearable embroidery helps search engines see the connection between practical how-tos and creative ideas. Approaching patches from this broader vocabulary keeps content rich, discoverable, and aligned with user intent.
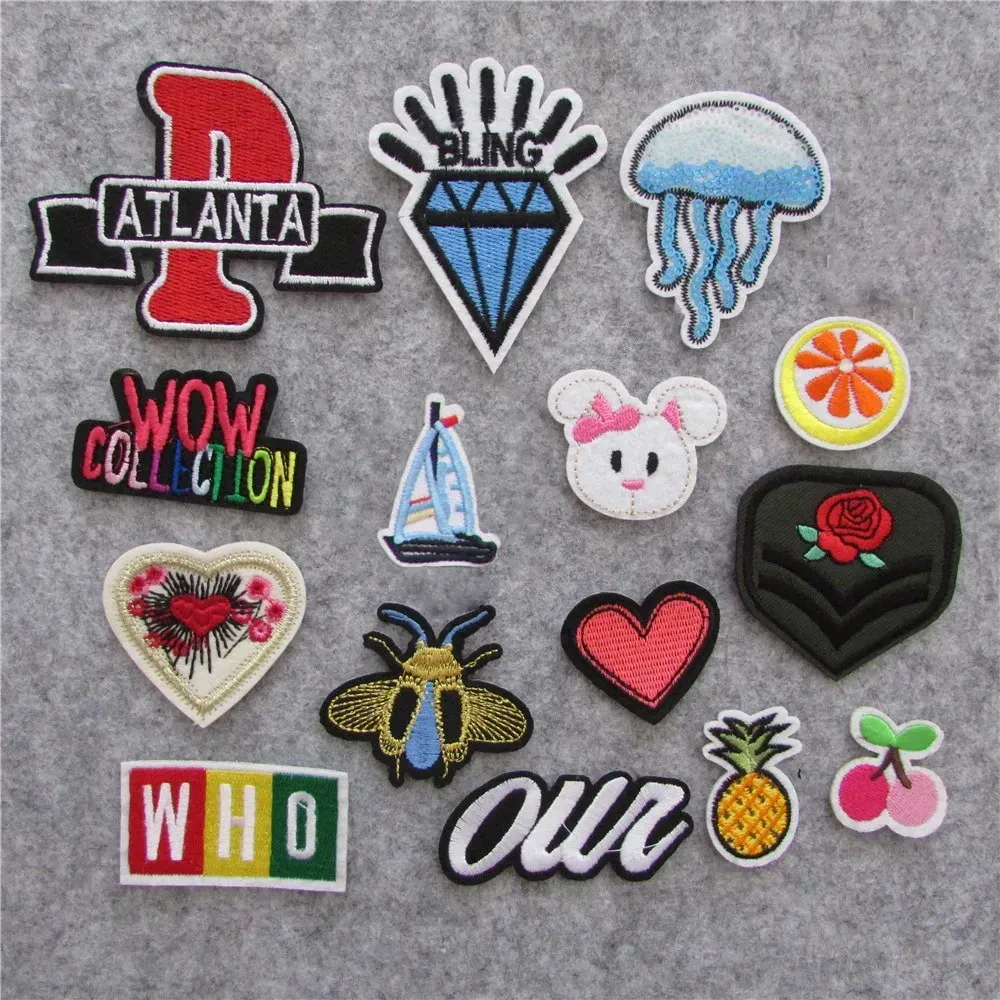
Understanding Patches for Clothing and Accessories: The Basics
Patches for clothing and accessories are a powerful, affordable way to express personal style, extend the life of garments, and create unique items that tell a story. From denim jackets to backpacks and hats, patches add color, texture, and a sense of personality to everyday wardrobe pieces.
Understanding the differences between iron-on patches and sew-on patches helps you choose the best method for your fabric and project. Whether you want a quick update or a durable repair, knowing how to apply patches will guide your tool choice and technique.
Choosing the Right Patches: Style, Material, and Size
Selecting patches for clothing and accessories means balancing size, shape, color, and theme with the surface you are patching. Consider how the patch will sit on the item and how much visual impact you want.
Take into account the fabric weight and wear pattern. Heavier fabrics like denim or canvas tolerate larger patches and stronger attachments, while delicate fabrics may benefit from sewing patches or smaller iron-on options with extra care.
How to Apply Patches: Iron-On Methods and Tips
How to apply patches using iron-on backings is a fast and beginner friendly approach. Iron-on patches bond with heat activated adhesive that joins to fabric with a household iron or heat press.
Prepare the surface, position the patch, apply heat for the recommended time, and allow it to cool before checking the bond. This method works well on t shirts, jeans, backpacks, and hats when performed with care.
How to Apply Patches: Sew-On Methods for Durability
Sew-on patches provide a long lasting option for durable wear, especially on heavy fabrics that go through frequent washing.
How to apply patches by sewing involves pinning or tacking the patch in place, threading a matching needle, and using tight running or whip stitches around the edge. For extra durability you can use a sewing machine with zigzag or satin stitches.
Patch Customization Ideas to Personalize Clothing and Accessories
Patch customization ideas invite creativity and self expression. Mix and match colors, layer patches in a grid or collage, pursue monochrome edits, build themed collections, or upcycle old garments into fresh pieces.
To plan a patch project, map out layout first, consider placement on sleeves and pockets, and think about how the patches will be seen from different angles. When using iron-on patches, ensure the fabric is clean and dry and test heat settings before full application.
Care, Removal, and Maintenance of Patches
Care and removal of patches is an important part of maintenance. Follow care instructions on patch packaging and garment labels, wash patches inside out on a gentle cycle, and avoid high heat that can loosen edges.
For removal or repositioning, iron-on patches can sometimes be peeled away with careful heat but may leave residue, while sew-on patches require seam ripping or careful unstitching. Store patches flat and protected from moisture to preserve adhesive or stitching for future reuse.
Frequently Asked Questions
What are patches for clothing and accessories, and what should you consider when choosing patches for clothing and accessories?
Patches for clothing and accessories are decorative pieces that attach to garments to personalize or extend their life. When choosing patches, consider fabric type, patch size and shape, design theme, backing material, and how durable the attachment should be. For beginners, iron-on patches offer quick results, while sew-on patches tend to last longer on high wear items.
What is the difference between iron-on patches and sew-on patches, and when should you use each for patches for clothing and accessories?
Iron-on patches use a heat activated adhesive and are quick and beginner friendly. They work well on cotton and blends but may not hold as long on frequent washing. Sew-on patches are stitched on and provide durable wear, especially on backpacks, denim jackets, and hats. Use iron-on for fast embellishments and sew-on for heavy fabrics or items that go through many washes.
How to apply patches and what are the best steps for applying iron-on patches and sew-on patches to different fabrics?
For iron-on patches: prepare the surface, position the patch, apply heat with the iron at the correct setting, test the bond, and seal the edges. For sew-on patches: place the patch, pin or use temporary adhesive, stitch around the edge with a tight stitch by hand or a sewing machine, finish securely, and consider a zigzag stitch for extra durability on some fabrics.
What are patch customization ideas for patches for clothing and accessories?
Patch customization ideas include mixing and matching colors and themes, layering patches to create a collage, using monochrome patches for a minimalist look, building themed collections around hobbies or bands, and upcycling old items by adding new patch designs.
How to care and remove patches for clothing and accessories and keep them looking fresh?
Care tips include following patch and garment labels, washing inside out on a gentle cycle, and avoiding high heat. Reheat iron-on patches if edges lift, and reinforce sew-on patches with extra stitches. To remove or reposition patches, use heat to loosen adhesive for iron-ons or seam ripping tools for sew-ons, and store removed patches flat for reuse.
What common mistakes should you avoid with patches for clothing and accessories and how can you troubleshoot issues like peeling edges or misalignment?
Common mistakes include peeling edges on iron-on patches, misalignment, and fabric fraying. Troubleshooting tips: apply heat longer with a pressing cloth, use a small zigzag or satin stitch around the edge, pin patches before sewing to ensure symmetry, and add a stabilizer behind the patch on fray-prone fabrics. If heat is too high on delicate fabrics, lower the temperature and press time.
| Aspect | Key Points |
|---|---|
| What are patches and why they matter? |
Patches are pieces of fabric, embroidery, or vinyl designed to be affixed to a garment or accessory. They come in two common attachment styles: iron-on patches and sew-on patches. They extend the life of items, celebrate hobbies or milestones, and express personal style. |
| Iron-on patches (quick, beginner-friendly) |
|
| Sew-on patches (durable) |
|
| Care and maintenance for patches |
|
| Patch customization ideas |
|
| Patch care and removal |
|
| Practical guidance for different surfaces |
|
| Common mistakes and troubleshooting |
|
| Patches across different settings |
|
| Sustainability and value |
|
Summary
Patches for clothing and accessories open a canvas for personal storytelling and style, transforming ordinary garments into wearable art. This conclusion highlights how patches can be applied, customized, and cared for to extend life, celebrate individuality, and sustain wardrobe value. Whether you start with iron-on quick updates or sew-on durable upgrades, patches offer a flexible, creative pathway to lifelong wear and self-expression. By choosing appropriate patches, following proper application and care steps, and experimenting with arrangement, you can build a dynamic collection that reflects your tastes while remaining practical for everyday use.