
A DIY screen printing studio at home can be a game changer for artists, crafters, and small-scale makers who want hands-on control over their design-to-product process. A well-planned setup gives you creative freedom to experiment with inks and fabrics while maintaining safety and ventilation. This guide covers a practical home screen printing setup to get you started. By following a clear plan, you’ll reduce waste, speed up your workflow, and produce consistent results that showcase your best work. Whether you’re printing t-shirts, posters, or totes, the right environment matters as much as the right tools.
From a different angle, picture a silkscreen printing at home space that fits your space, budget, and daily routine. Reframing the topic in terms of an at-home workshop helps you envision a compact, efficient area that supports design, coating, exposure, and curing. Inspiration can come from screen printing workspace ideas, which suggests practical layouts, zones, and storage to keep your process smooth. With careful budgeting, you’ll create a personal studio that grows with your skills.
DIY screen printing studio: planning your space for creativity and safety
A successful DIY screen printing studio starts long before you unpack inks. Begin by planning your space around distinct zones for design, coating and drying, exposure and washing, printing, and curing. A well-considered layout reduces cross-contamination, speeds up your workflow, and makes safety a natural habit.
In addition to space, prioritize ventilation and safety. A dedicated room or ventilated corner with access to a sink keeps fumes and cleanup manageable. Map electrical needs and plan for an exhaust option or a window vent, so you can run exposure units and curing tools without creating a tangle of cords or compromising air quality.
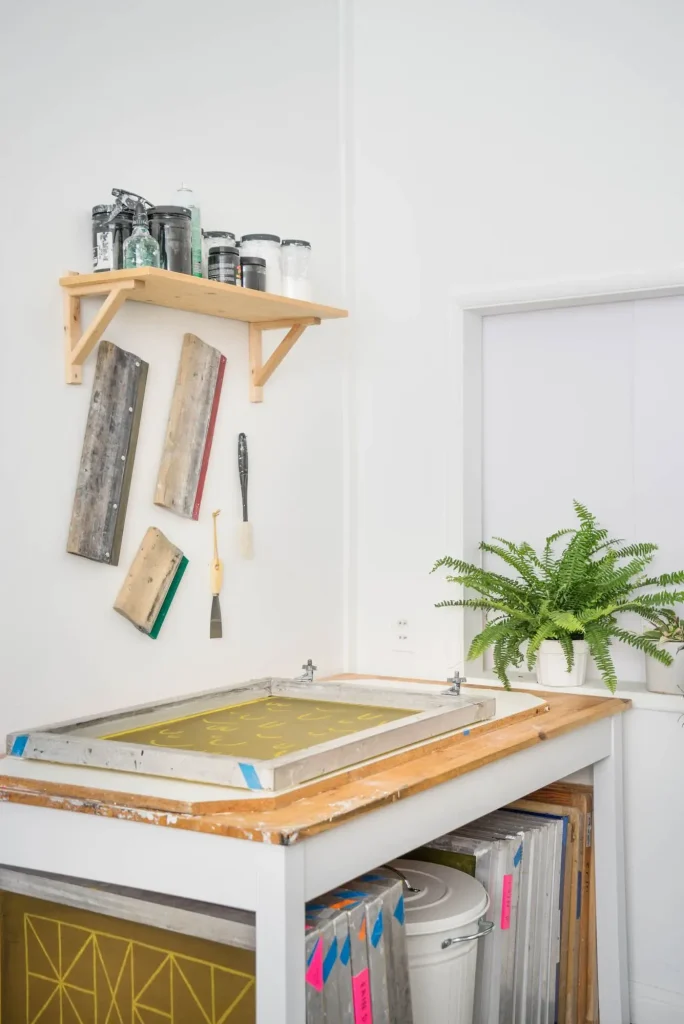
Equipment essentials: building the equipment list for screen printing studio and a beginner kit
Start your journey with a focused equipment list for screen printing studio that covers the basics and leaves room to upgrade. Key items include screens and frames, emulsion, a scoop coater, squeegees in multiple sizes, a basic ink set, a washout station, a drying rack, and a simple curing method.
As a beginner, assemble a beginner screen printing kit and grow from a compact setup. Prioritize clean storage, a light-safe area for exposing screens, and scalable options like a manual press or single-screen workflow. With modular components, you can upgrade when your projects demand more color runs or larger fabrics.
Home screen printing setup: configuring a practical workspace with table, lighting, and ventilation
In a practical home screen printing setup, planning begins with a sturdy worktable, accessible shelves, and clearly defined zones so you can coat, expose, print, and cure without backtracking. Aim for daylight-balanced lighting and a clean layout that makes color matching easier across sessions.
Good airflow matters more than you might think. Provide a dedicated ventilation approach and a small exhaust or fan to move fumes away from the work zone. Having a sink or water supply nearby makes cleanup quick and reduces the risk of spills seeping into finished prints.
Silkscreen printing at home: mastering coating, exposure, and washout stages
Silkscreen printing at home follows a sequence of coating, drying, exposing, and washing out. Start by coating screens with emulsion using a scoop coater in a dark or light-safe area, then let them dry on a rack away from dust. When your screens are ready, place your design and expose with your chosen light source, then rinse to reveal crisp images.
Maintaining consistency in the washout and exposure steps helps ensure repeatable results across runs. Keep a clean washout station, use clean water, and inspect screens for incomplete or blurred areas before printing. A simple, repeatable workflow reduces mistakes and supports steady production.
Screen printing workspace ideas: layout, zones, and organization for efficiency
Screen printing workspace ideas come to life when you separate tasks into zones and build an organized storage system. Separate design, coating, exposure, washout, printing, and curing areas to minimize cross-contamination and speed up production. Use open shelves, labeled bins, and a few modular carts to keep supplies within arm’s reach.
Smart layout also means protecting your workspace from spills and fumes. Use spill-proof trays, temperature-stable tables, and a ventilation plan that keeps air fresh during cleanup. Color-sensitive lighting helps you judge ink shades consistently for more reliable color matching across runs.
Beginner screen printing kit and starter workflow: from design to cure in your DIY studio
Beginner screen printing kit and starter workflow help you get productive quickly. Start by choosing a basic set of inks, emulsions, screens, and a simple press or solo-color setup. Gather a beginner screen printing kit that includes essential tools, a light-safe exposure area, and a straightforward plan for color separation and testing.
From design to curing, follow a simple workflow to build confidence. Design digitally, separate colors, coat and dry screens, expose, wash out, test print, cure, and clean. Document settings for different fabrics and ink types so your next run follows the same successful steps in your DIY studio.
Frequently Asked Questions
What is a DIY screen printing studio and how does a home screen printing setup support beginners?
A DIY screen printing studio is a dedicated, safe space at home to design, burn, print, and cure screens with a clear workflow and proper ventilation. A well-planned home screen printing setup groups design, exposure, printing, and curing in logical zones, enabling steady practice, experimentation with inks and fabrics, and consistent results from session to session.
What is the essential equipment list for screen printing studio in a DIY setup?
The essential equipment list for screen printing studio includes: screens and frames; emulsion and scoop coater; squeegees in multiple sizes; inks and functional additives; a printing press or single-screen workflow; a washout/reclaim station; a drying rack and curing method; bright, neutral lighting; a sturdy worktable and proper ventilation; safety gear and cleaners; and organized storage.
What should a beginner screen printing kit include for a DIY screen printing studio at home?
For a beginner screen printing kit, start with one or two screens, a solid worktable, a reliable scoop coater, a few squeegees, an introductory ink set, a simple washout setup, a drying rack and curing option, good lighting, and basic safety gear.
How can I design an efficient home screen printing setup for a DIY screen printing studio?
To set up a home screen printing setup, designate zones for design, coating, exposure, washout, printing, and curing; ensure ventilation and access to water; install adequate outlets and cord management; and keep a tidy, labeled system so you can work efficiently and safely.
What screen printing workspace ideas work best for a DIY screen printing studio?
Screen printing workspace ideas include separate functional zones, easily accessible storage for inks and tools, spill-proof surfaces, bright neutral lighting for color accuracy, a simple cleanup routine, and a dedicated area for washing and drying to keep your workflow smooth.
How can I scale from a beginner to a multi-color workflow in a DIY screen printing studio, including silkscreen printing at home?
To scale from a beginner to a multi-color workflow in a DIY screen printing studio, maintain a solid foundation with a stable workspace and repeatable processes, then add upgrades such as a multi-station press, a photosensitive exposure unit, a reclaim station, and a dedicated curing area. If you’re doing silkscreen printing at home, keep color separations precise and cure times consistent for durable results.
| Aspect | Key Points |
|---|---|
| What is a DIY screen printing studio? | Dedicated area to design, prepare, burn, expose, wash out, print, and cure screens; emphasizes safety, organization, and a steady workflow; reflects a do-it-yourself mindset. |
| Planning your space | Create zones for design, coating/drying, exposure/washing, printing, and curing; separate bright-exposure area from washout; ensure ventilation; prefer a dedicated room or ventilated corner with sink/countertop; allow for a compact table setup with spill control and airflow. |
| Essential equipment list (starter kit) | Core items include: screens/frames; emulsion and sundries; squeegees/rake tools; inks and additives; printing press or simple single-screen workflow; washout/reclaim station; drying rack and curing system; lighting; worktable plus ventilation; safety gear and cleaners; storage/organization. |
| Optional upgrades (as you grow) | Add a multi-station press for faster multi-color work; photosensitive exposure unit for repeatable burns; reclaim station with efficient washout; dedicated higher-temperature curing area for faster drying. |
| Workspace layout tips | Separate zones, keep frequently used items within arm’s reach, clean-as-you-go routines, contain spills, ensure good lighting for color accuracy, maintain adequate ventilation, and prioritize safety with clearly labeled, closed containers. |
| A starter equipment list in practice | Practical starter items: one or two screens, sturdy non-porous worktable, reliable scoop coater, multi-size squeegees, basic slow-drying inks with reducers, washout station with sink, drying rack, basic lighting and ventilation plan, and simple labeling/organization system. |
| How to set up and run a simple workflow | 1) Design and separate artwork; 2) Coat and dry screens in a dark/light-safe area; 3) Expose and develop; 4) Set up a test print; 5) Cure and finish; 6) Clean and store. Follow a repeatable sequence for consistency. |
| Budgeting and planning for growth | Start with essential items, plan a few core runs to estimate needs, keep a simple line-item budget for screens, ink, emulsion, and cleaners, and upgrade gradually as you gain experience. |
| Maintenance, safety, and best practices | Regularly clean screens, check frame integrity, replace worn emulsion or screens, store inks/solvents per safety data sheets, ensure ventilation during cleaning/curing, wear gloves/eye protection, and keep a fire extinguisher accessible. |
| Troubleshooting common issues | Common problems: misalignment, incomplete ink transfer, screen blurring. Remedies: re-check screen tension, thorough cleaning, correct squeegee pressure, adjust ink ratios; verify curing temperature/time and maintain project notes for reproducibility. |