
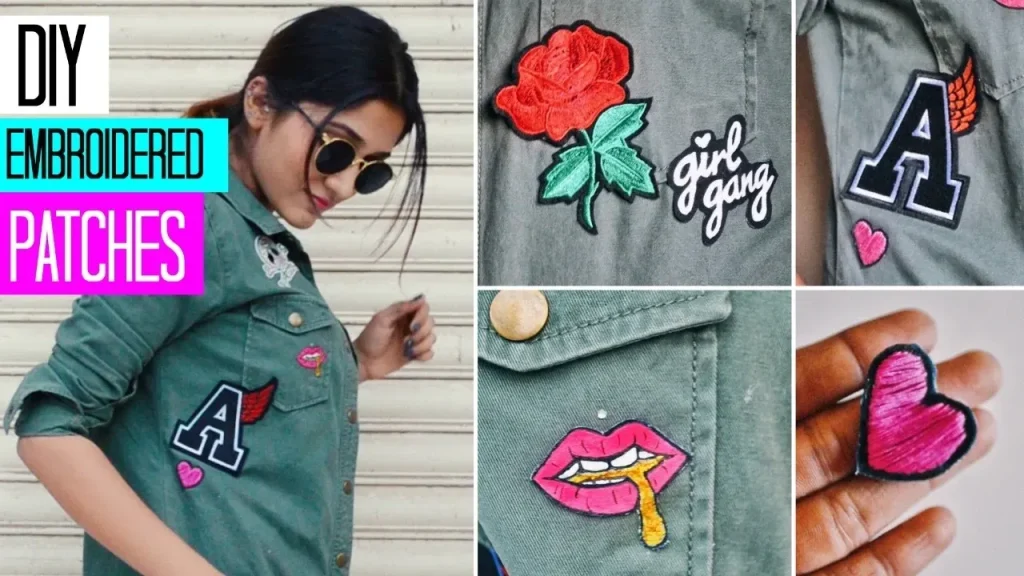
DIY custom embroidered patches have exploded in popularity, offering a fun way to personalize clothing, bags, hats, and gear for everyday wear, special events, and team spirit, whether you’re reviving old garments or starting a brand-new project. If you’re curious how to make embroidered patches, this beginner-friendly guide blends practical steps with creative ideas, helping you move from concept to stitched emblem with confidence, while demystifying common techniques, stitch types, and troubleshooting tips that often deter new makers. This introductory overview doubles as an embroidered patch tutorial, covering the essential tools, stabilizers, threads, hooping, transfer marks, and finishing options so you can start stitching right away and achieve durable, professional-looking results that hold up under movement and washing. We’ll break down material choices, design considerations, and simple workflows that keep the process approachable, showing how to select fabrics, suggest color palettes, plan borders, and test tension, so you consistently produce patches that look polished and cohesive with your gear. Whether you’re patching jackets, backpacks, or hats, you’ll find clear, practical guidance and custom patch design ideas that translate your inspirations into wearable art, while offering scalable techniques you can reuse on future patches or small collections for your growing patch portfolio and shop.
Beyond traditional sewing projects, this craft translates to a range of textile embellishments, including stitched emblems, fabric badges, or sew-on patches that let you brand gear, celebrate teams, or personalize wardrobes. You might think of them as embroidered emblems, decorative patches, or fabric adornments, each built from a simple design translated into durable stitching on sturdy backing. These small, durable motifs suit upcycling projects, school or club branding, or personal gift ideas, and they work with both machine and hand embroidery workflows.
Getting Started: Essential Tools and Setup for Embroidered Patches
Starting your patch journey begins with the right workstation and a basic toolkit. If you’re wondering how to make embroidered patches, gather a sturdy embroidery setup (machine or hand), a taut hoop, and the appropriate stabilizers like tear-away or cutaway. Select fabrics such as denim, twill, or sturdy cotton for a durable patch back. Keep your color palette limited to 3–6 colors to simplify the process.
Organize your space and test stitch small samples. An aware approach to stabilizers helps prevent puckering, while proper backing and a heat source let you finish patches cleanly. This is the foundation of an embroidered patch tutorial that beginners can follow with confidence.
With the right tools in place, you’ll be ready to move into the core of the DIY process and translate ideas into stitched patches.
DIY custom embroidered patches: Designing for Impact
Designing patches starts with an idea and a clear goal for readability. For DIY custom embroidered patches, sketch a bold central motif and a framing border to define the edge. Consider the color contrast and how your patch will sit on fabrics. This is where custom patch design ideas meet practical embroidery.
Choose typography carefully if text is included; bold, legible font helps, and outlining text with a contrasting color improves visibility. Use a simplified layout to keep stitches manageable, aligning with beginner-friendly content about how to make embroidered patches and implementing a good embroidered patch tutorial.
Experiment with layered textures using satin stitches for borders and fill stitches for shapes. This approach gives depth without complicating stitch counts, making machine embroidery patches look polished and durable.
Beginner-Friendly Techniques for Great Patch Embroidery
For beginners, mastering a few stitches makes a big difference. A simple satin stitch around the edge creates a crisp outline, while fill stitches bring shapes to life. Start with a limited color palette and practice tension to avoid puckering, aligning with beginner embroidery patches guidance.
Test stitch on scrap fabric before applying to your final patch. Use a stable hoop, adjust needle size and thread tension, and keep stitch lengths short for clean edges. The goal is consistent, neat stitching that resembles a professional finish.
Finish with a satin stitch edge to seal the border, and trim carefully. This hands-on practice is the heart of any embroidered patch tutorial aimed at beginners.
Machine embroidery patches vs Hand-stitched Patches: Choosing Your Path
Machine embroidery patches offer speed and consistency, with features like jump stitch capability and embroidery hoop quality. They’re ideal for machine embroidery patches that scale to multiple patches quickly, while providing durable results.
Hand-stitching patches remains viable for small runs or artisanal feels. If you’re using hand embroidery, keep tension even and use short stitches to avoid distortion. Each method has trade-offs in time, texture, and finished look.
When deciding, consider your project scope, budget, and whether you want a polished, machine-aided finish or the charm of hand-stitched details.
Custom Patch Design Ideas: From Bold Shapes to Readable Text
Bold, high-contrast color schemes help patches read from a distance. Geometric shapes, icons, and simple typography translate well to embroidery, especially for beginners who are learning how to make embroidered patches.
Experiment with patch shapes—circles, shields, and rounded rectangles—since edge geometry influence how the patch sits on fabric. Layer textures by combining satin stitches with applique, or add felt backing for dimension.
Consider using color gradients with a limited palette to create a polished, professional look while keeping stitch counts reasonable.
Embroidered Patch Tutorial: Step-by-Step from Concept to Finished Patch
This embroidered patch tutorial walks you from concept to finished patch. Start with a simple design, prepare stabilizer, place fabric in a hoop, transfer your design, and choose a color sequence that outlines first, fills next, then details.
After stitching, trim the patch leaving a small border, peel away tear-away stabilizer, secure a backing, and optionally add heat-activated adhesive. Finish with a satin stitch around the edge to seal the border and prevent fraying.
Finally, perform final checks for loose threads and misalignments, re-press to fuse backing if needed, and decide whether this patch will be iron-on, sew-on, or both. This practical walkthrough echoes the content you’ll find in an embroidered patch tutorial for beginners.
Frequently Asked Questions
What are DIY custom embroidered patches and who should try them?
DIY custom embroidered patches are stitched emblems you create to personalize clothing, bags, hats, and gear. They’re beginner-friendly and scalable, making them suitable for crafters of all levels, with options for iron-on or sew-on attachment.
What tools and materials do I need to start making embroidered patches?
To start making DIY custom embroidered patches, gather a basic embroidery setup (machine or hand), stabilizers (tear-away or cutaway), sturdy fabric for the patch back, embroidery thread, an embroidery hoop, scissors, and a heat source for finishing. Following an embroidered patch tutorial, keep the setup simple to build confidence.
What is the core process in an embroidered patch tutorial for beginners?
A simple, beginner-friendly embroidered patch tutorial covers design, prepare stabilizers and fabric, transfer the design, stitch the outline and fill, then trim and finish with a satin edge. This sequence helps ensure a clean, durable patch and teaches how to make embroidered patches effectively.
What are some custom patch design ideas for DIY projects?
Try custom patch design ideas that are bold and legible: simple shapes, high-contrast colors, clear typography, and minimal detail. These custom patch design ideas translate well to DIY custom embroidered patches and keep stitching manageable for beginners.
What common problems occur in machine embroidery patches and how can I fix them?
Common issues include fabric distortion, skipped stitches, puckering, and frayed edges. For DIY custom embroidered patches, check hoop tension, needle and thread quality, and stabilizer choice, and adjust stitch density to fix these problems.
How do I finish and apply DIY custom embroidered patches to clothing?
Finish patches with a backing (iron-on or sew-on), seal the edge with a satin stitch, and attach using the method you prefer (iron-on or sewing). This completes your DIY custom embroidered patches and makes them ready to wear.
| Section | Key Points |
|---|---|
| Introduction |
|
| What You Need to Get Started |
|
| Step‑by‑Step Guide |
|
| Design Ideas and Techniques |
|
| Common Mistakes and How to Fix Them |
|
| Advanced Tips and Variations |
|
| Applications |
|
Summary
DIY custom embroidered patches offer a satisfying, creative outlet that yields tangible, usable results. With the right tools, a clear design plan, and patient stitching, beginners can produce patches that look professional and durable. By following the outlined steps and ideas, you can translate ideas into stitched emblems to wear or gift. Start simple with small designs and a limited color palette, and gradually explore more advanced techniques to develop your personal style and a growing collection. Whether for personal use, gifts, or a small business, the fundamentals remain: plan thoughtfully, stitch carefully, and finish with care.