
DIY embroidery patches open a world of creative customization for everyday items. If you’ve ever looked at a frayed denim jacket, a worn bag, or a backpack that could use a little personality, patches offer a simple, satisfying way to refresh fabric and tell your story, whether you’re exploring custom embroidery patches, embroidery patches for jeans, or iron-on patches. This guide explains how to make embroidery patches that look polished and last through regular wear. You’ll learn how to design patches, choose materials, stitch techniques, and apply patches to bags and jeans with confidence, including patch embroidery on denim. Along the way, you’ll see why these patches are a popular choice for upcycling, gifting, and adding a personal touch to your wardrobe.
Beyond the term patches, you might describe these as embroidered badges, fabric appliqués, or decorative sew-on emblems that add character to a jacket or tote. LSI-friendly terms like fabric badges, stitched emblems, and wearable art signal the same idea in search results, helping readers discover techniques regardless of the name. In practice, these alternatives invite you to explore DIY decorations for denim, canvas, and other textiles. Whether you call them sewn-on badges or decorative patchwork, the core concept remains: stitching colorful, durable accents that personalize everyday items.
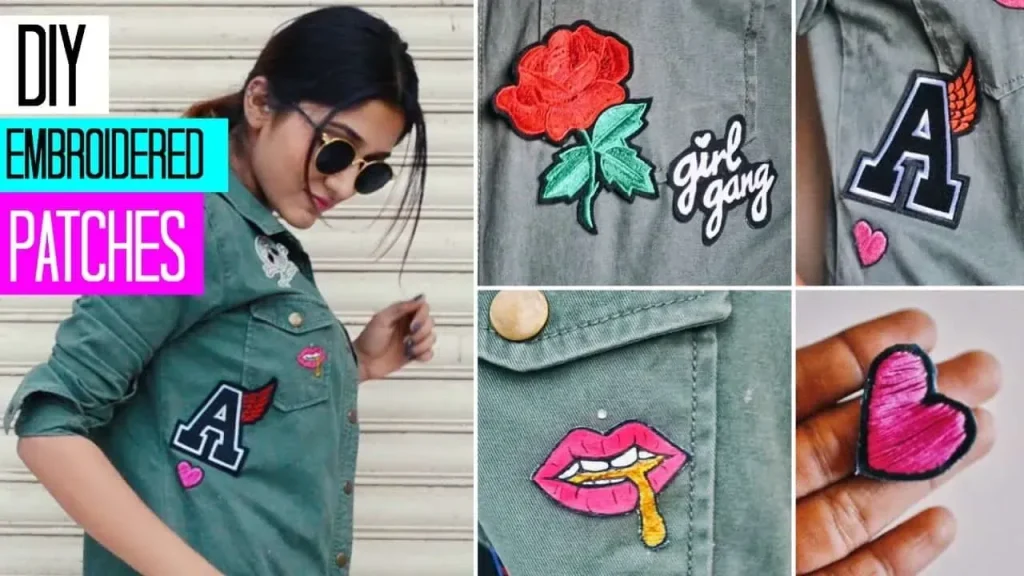
DIY Embroidery Patches: Design Ideas to Personalize Bags, Jeans, and Jackets
DIY embroidery patches open a world of creative customization for everyday items. When you design patches, think about telling your story through motifs that reflect your style, whether that’s a floral-inspired bag embellishment or a bold geometric patch on a denim jacket. If you’re wondering how to begin, start with simple sketches and consider how the patch will be viewed from a distance to guide stitch density and color choices. This is a practical example of how to make embroidery patches that feel personal yet polished, blending crafting charm with everyday usability.
For those exploring how to make embroidery patches, design choices should balance aesthetics with durability. Consider incorporating elements that pair well with denim, canvas, or tote fabrics, and experiment with monograms, travel themes, or nature motifs. You’ll also find it helpful to browse ideas that align with your existing wardrobe and gifting goals, whether you’re crafting custom embroidery patches for jeans or creating embroidered accents for a favorite bag. The result is wearable art that fits seamlessly into your daily outfit rotation.
Materials and Stabilizers for Durable Patches: From Fabric to Backing
Before you start stitching, gather core materials that support clean edges and lasting wear. Fabric scraps or felt provide a sturdy base, while embroidery floss in a range of colors ensures your patch reads clearly from a distance. A stabilizer is especially important when applying patches to stretchy fabrics or denim blends, helping to prevent distortion during embroidery and washing.
Backing options matter as much as thread choice. If you plan to use iron-on methods, keep iron-on sheets or fusible webbing on hand, along with regular sewing supplies if you prefer sew-on patches. This aligns with how to make embroidery patches as a technique, because the backing directly influences edge neatness and durability. For denim or heavier materials, a light stabilizer behind the patch can preserve its shape, while a finishing backing keeps the edges clean after application.
How to Make Embroidery Patches: Step-by-Step Techniques for Clean Edges
A strong patch starts with a clear plan and precise stitching. Start by transferring your outline onto fabric with a water-soluble pen or transfer paper, then secure the design with a light transfer to guide stitching. As you fill areas, use satin stitches or long-and-short stitches to build texture and color blocks that read crisply from a distance, while edge finishing keeps the border tidy.
Edge finishing is often the difference between a patch that looks handmade and one that looks professional. Leave a small border of fabric around the design and finish it with a tight satin stitch or a narrow backstitch around the perimeter. If you’re using an iron-on backing, apply heat per the product instructions after embroidery is complete to set the bond, then reinforce with a few hand stitches for added durability—especially on bags and jeans that see frequent washing.
Iron-On Patches vs Sew-On: Pros, Cons, and Hybrid Solutions for Everyday Wear
Iron-on patches offer speed and convenience, making them ideal for quick updates to totes, jackets, or backpacks. They’re particularly useful for beginners who want to see results fast, and they pair well with fabrics that tolerate heat well. However, for high-wear areas like jean knees or backpack straps, iron-on patches may benefit from a few hand stitches around the edge to lock everything in place.
Sew-on patches demand a stitching commitment but reward you with long-lasting durability. For heavy-use fabrics such as denim, sew-on options survive repeated washing better than their iron-on counterparts. Many crafters adopt a hybrid approach: use iron-on patches for initial placement and then secure with a border of tight running stitches or a small backstitch to prevent lifting at the edges, embracing the best of both techniques for patch embroidery on denim.
Patch Embroidery on Denim: Tips for Longevity on Jeans and Denim Accessories
Denim provides a robust canvas for patch embroidery on denim, but it also presents unique challenges like friction at seams and frequent washing. Choose sturdy fabrics such as felt or canvas for the patch base, and reinforce the area behind the patch with stabilizers to minimize puckering on denim. Using strong, dense stitching around the edge helps prevent fraying and keeps the patch intact through many wears.
When focusing on embroidery patches for jeans, position patches on high-wear zones like the thighs or back pockets and consider a border stitch that anchors the edge. A combination of satin fill for larger areas and backstitch for fine details can yield a polished look that stands up to jeans’ regular motion. If you’re planning to wash denim often, plan for extra border stitches and occasional reapplication checks to ensure your patch remains securely attached.
Applying and Finishing Patches: Care, Washing, and Upcycling Ideas
Applying patches is the final step in turning your design into wearable art. For iron-on patches, follow heat settings precisely to achieve a secure bond, then allow the patch to cool before handling. If you’re sewing on patches, pin the patch in place and stitch around the border with a tight running stitch or small backstitch for durability. This careful approach aligns with the idea of creating custom embroidery patches that endure daily wear.
Care and maintenance extend the life of patches through repeated washing and daily use. Test on scrap fabric to fine-tune tension and stitch density, and consider adding a few interior stitches or a light border line for extra security in high-wear areas. Upcycling old garments with patch embroidery on denim or other fabrics is a satisfying way to refresh items and reduce waste, turning worn pieces into fresh, personalized staples.
Frequently Asked Questions
How can I make DIY embroidery patches at home?
To make DIY embroidery patches at home, start with a simple design and gather fabric scraps or felt, embroidery floss, a hoop, stabilizer, a suitable needle, and backing. Transfer the design, outline it, and fill areas with satin or long-and-short stitches. Finish the edges with a tight satin border and choose iron-on backing for quick attachment or sew-on for durability.
What materials do I need for custom embroidery patches?
For custom embroidery patches, gather fabric scraps or felt, embroidery floss in multiple colors, sharp scissors, a hoop, stabilizer, an embroidery needle, and a backing for the patch. If you’ll use iron-on patches, have iron-on sheets or fusible webbing; for sew-on patches, keep basic sewing supplies like thread and a needle.
Which stitches work best for embroidery patches for jeans?
For jeans, use durable stitches: satin stitch for filled areas, chain stitch for borders, and backstitch or running stitch for detail. Use a stabilizer behind the patch to prevent puckering and stitch through both denim and stabilizer as needed. Finish with a dense edge to reduce fraying.
Should I use iron-on patches or sew-on patches, and how do I apply them?
Iron-on patches are quick to use, but sew-on patches offer more durability for denim. A practical approach is to position with iron-on backing, then secure the edge with a few hand stitches around the border. Always follow the backing’s heat instructions and consider additional stitching for longevity.
What are common mistakes in patch embroidery on denim and how can I fix them?
Common mistakes in patch embroidery on denim include puckering, frayed edges, uneven shapes, and patches detaching after washing. Fix them by using stabilizer, adjusting tension, choosing a denser edge stitch, crafting a precise template, and adding extra stitches along the edge for durability.
How can I design durable DIY embroidery patches that last through washing?
To design durable DIY embroidery patches that survive washing, choose sturdy fabrics, back with stabilizer, and finish edges with tight satin stitches. Test wash on scrap first and consider a hybrid attachment (iron-on for placement plus sew-on border) for longevity on jeans or bags.
| Aspect | Key Points |
|---|---|
| Purpose and Benefits | Refresh fabrics and tell your story; upcycling, gifting, and wardrobe personalization. |
| Materials & Planning | Fabric scraps or felt; embroidery floss; scissors; hoop; stabilizer; embroidery needle; backing; iron-on sheets or fusible webbing; regular sewing supplies for sew-on. |
| Design Ideas & Fabrics | Monograms/initials; floral or geometric motifs; thematic patches; mixed-media textures; durability: denim, felt, canvas; stabilizers to prevent puckering. |
| Techniques & Stitches | Outline transfer; satin/chain stitches for filled areas; backstitch/running stitch for detail; edge finishing with a small border; stabilize patch behind; denim stitching through patch and stabilizer if needed. |
| Applying Patches | Iron-on patches for quick adhesion or sew-on patches for durability; hybrid approach combines both; heat settings per backing instructions. |
| Step-by-Step Project Outline | Design and patch shape; cut material and stabilize; begin with a light outline and fill; finish edges with a tight satin stitch; prepare for application (heat settings or stitching); apply to bags or jeans with appropriate method. |
| Practical Tips | Test on scrap fabric; use a hoop or frame; work inside-out with multiple layers; for denim, add interior stitches and a small zigzag; preheat fabric for better iron-on adhesion. |
| Common Mistakes & Fixes | Puckering: adjust tension or use stabilizer; frayed edges: denser edge stitches; uneven shapes: use templates; detachment after washing: add extra border stitches. |
| Creative Ideas & Finishing Touches | Combine embroidery with applique; add metallic threads; use contrasting colors; vary patch sizes for jackets or totes. |
| Terminology & Tutorials Note | Terms like how to make embroidery patches, custom embroidery patches, embroidery patches for jeans, iron-on patches, and patch embroidery on denim—these describe related techniques and end uses. |
Summary
DIY embroidery patches let you personalize bags and jeans in a way that’s uniquely yours. By planning your design, choosing the right materials, mastering a few stitch techniques, and deciding whether to use iron-on or sew-on methods, you can create patches that endure daily wear and washing. These patches support upcycling, gifting, and adding a personal touch to your wardrobe. Whether patch embroidery on denim for a rugged look or crafting custom embroidery patches for a bag you love, the results are functional and expressive. With time and practice, you’ll build a patch-making routine that keeps garments out of the donation pile and gives you a tangible project you can wear and share with pride. The joy of DIY embroidery patches is that you can start small, try new stitches, and gradually grow your collection of patch designs—turning fabric into a canvas for creativity.