
DIY embroidered patches open a world of personal expression for your clothing, accessories, and gear, inviting you to tell a story stitch by stitch while transforming ordinary fabrics into wearable art that carries meaning beyond color and texture, and turning mundane outfits into conversation pieces. From a loved denim jacket to a sturdy tote bag, patches let you display a hobby, honor a memory, or refresh tired fabric, and learning patch embroidery techniques helps you control edges, coverage, and color balance for durable, crisp results, while this approach invites you to repurpose scraps, experiment with textures like felt and denim, and develop your own signature patch shapes that mirror your daily life. This guide walks you through easy choices for base fabrics, stabilizers, and threads, how to plan a design, and practical transfer methods that reduce crooked lines, and you’ll discover step-by-step stitching methods like satin stitch and backstitch, plus tips for layering colors without overwhelming the silhouette. Whether you sew patches on for lasting durability or use a heat-activated backing for quick styling, the goal is a clean edge, balanced color, and a patch that feels secure no matter how often it’s worn, washed, or crumpled in a bag. With patience and practice, you’ll custom-create a collection of patches that expresses your style and grows with your wardrobe, turning casual items into conversation pieces and inspiring you to try new shapes, sizes, and color stories.
Latent Semantic Indexing principles come into play as you frame the topic with related terms such as fabric badges, hand-stitched adornments, or wearable emblems—phrases that expand the idea without repeating the same wording. They function as quick fashion accessories, decorative appliqués, or personalized signals on jackets, bags, hats, and more. By using semantically related terms such as fabric applique, embroidered insignia, and removable heat-pressed emblems, you create content that supports readers’ understanding while helping search engines recognize the broader topic.
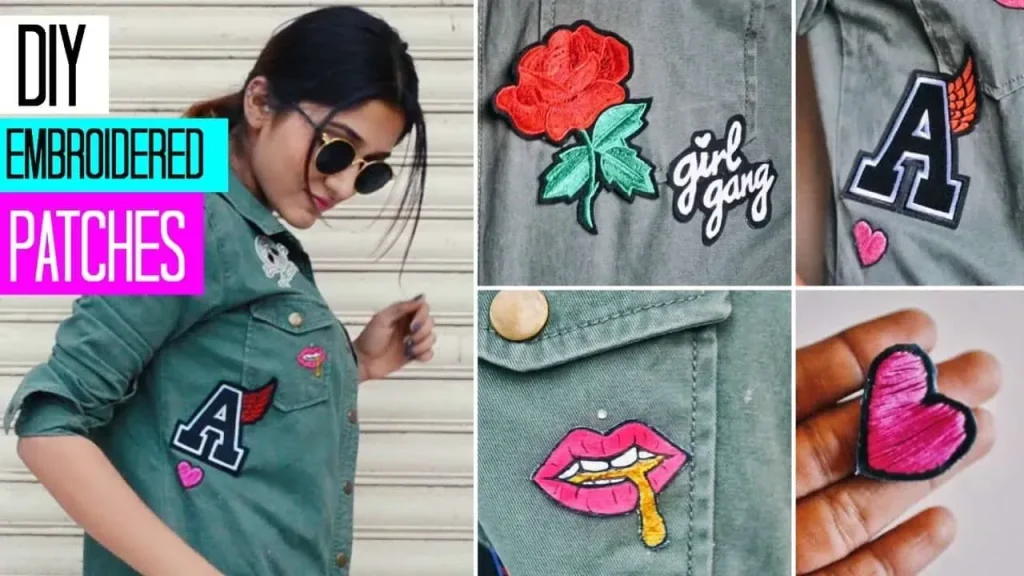
DIY embroidered patches — From Concept to Creation
DIY embroidered patches begin with a spark of an idea and a plan for how it will sit on fabric. If you’re wondering how to make embroidered patches, start with a simple concept, a quick sketch, and a clear goal for size and color. This approach keeps the project approachable for beginners while leaving room for personal flair as you gain confidence.
This subtopic sets you up for a practical path: translate your design into a stitch plan, choose a restrained color palette, and map out where the patch will live on the garment. As you explore a DIY patch embroidery tutorial, you’ll discover that patch embroidery techniques can be customized for texture, readability, and a polished finish that works on a range of fabrics.
Materials and Tools Essentials for DIY Patch Embroidery
Before you begin stitching, assemble core materials that create durable, clean patches. A fabric base, stabilizer, embroidery threads, and a needle suited to your fabric are essential, especially if you’re aiming for embroidered patches for clothing like jackets or jeans. The right backing and attachment options set the foundation for longevity and wear.
Additional tools—scissors, fabric pens, water-soluble markers, and a hoop or frame—help you transfer designs precisely and keep your stitches even. If you’re using iron-on backing, you’ll also want a steady iron, a pressing cloth, and perhaps a few securing stitches afterward to reinforce adhesion during laundering.
Transferring Design and Stitching: Core Patch Embroidery Techniques
Transferring your design reliably is a key step in the patch creation process. You can trace with a washable pen, use transfer paper, or apply a printed template onto stabilizer. This ensures crisp lines and accurate shapes as you begin your embroidery journey toward creating eye-catching patches with professional appeal.
Once the design is in place, apply patch embroidery techniques that balance texture and readability. For beginners, satin stitches around the edge create a bold outline, while backstitch and split stitch capture fine details like lettering. By varying stitch length and using a limited color palette, you can add depth without sacrificing legibility.
Backing Options: Iron-On Patches vs Sew-On Patches
A common question in DIY patch projects is choosing between iron-on patches and sew-on patches. Iron-on patches offer quick decoration and minimal fuss, ideal for light, casual wear or temporary embellishments. Sew-on patches provide maximum durability, making them better suited for items that will endure frequent washing.
Careful planning helps you decide which backing to use for embroidered patches for clothing. If you anticipate heavy laundering, a sew-on option reinforced with a few stitches around the edge can extend life. For home projects or items that won’t be washed as frequently, iron-on backing complemented by light stitching around the edge can give a clean finish.
Design Planning and Layout for a Patch Collection
Successful patches start with deliberate design planning. Sketch a theme, decide on shapes, and consider how multiple patches will coordinate on a single garment. If you’re new to patch embroidery, begin with a small set and expand into a cohesive collection as you gain confidence.
A DIY patch embroidery tutorial often emphasizes layout before stitching. Transfer your designs to stabilizer, arrange them on your garment mock-up, and adjust spacing and scale to maintain visual balance. By planning ahead, you’ll create a collection that feels intentional, not accidental.
Care, Finishing, and Longevity for Patches
Finishing touches matter for a polished look. Finish edges neatly, trim threads, and consider a light press to flatten the patch after cooling. If you used metallic or specialty threads, test a small sample first to ensure the sheen doesn’t bleed or kink.
To maximize longevity, follow care guidelines such as gentle washing, turning garments inside out, and avoiding high-heat drying where possible. Reinforce the patch border with a few stitches around the edge after attaching to the garment, and store collections flat to prevent distortion. This approach keeps your embroidered patches looking fresh and ready to wear.
Frequently Asked Questions
How can I start a DIY patch embroidery tutorial to learn how to make embroidered patches for clothing?
A beginner-friendly DIY patch embroidery tutorial starts with a clear design and a durable base. Gather core materials (fabric base, stabilizer, embroidery threads, needle and hoop), transfer the design, and outline a simple stitch plan. Begin stitching with a basic satin edge, then add details using backstitch or stem stitch. Finish the patch and attach it to your garment using sew-on or iron-on backing, depending on your preference.
In the context of DIY embroidered patches for clothing, which is better: iron-on patches vs sew-on patches?
Iron-on patches are quick and convenient, but may loosen with washing; sew-on patches offer maximum durability. For items that will be washed often, sewing them on is the safer choice. If you start with iron-on backing, reinforce the edges with a few stitches after applying heat for extra security.
What patch embroidery techniques are most beginner-friendly for DIY embroidered patches?
Beginner-friendly patch embroidery techniques include satin stitch for bold areas, backstitch for outlines, stem stitch for fine lines, and long-and-short shading for simple depth. Practice these on scraps before applying them to a patch and gradually combine them to build texture.
What are the essential supplies and steps in a DIY patch embroidery tutorial for making embroidered patches?
Core supplies include a fabric base, stabilizer, embroidery threads, needle and hoop, scissors, transfer tools, and a backing option (sew-on or iron-on). The steps are: prepare fabric and stabilizer, transfer the design, stitch with suitable techniques, add color, finish the edges, and attach the patch to the garment.
Where is the best placement for embroidered patches on clothing when DIY embroidered patches, and what design ideas work well?
Plan the layout before you sew or apply heat. Place larger patches on jackets, denim sleeves, or the back panel, then fill gaps with smaller designs. For best effect, choose designs with clear silhouettes and high contrast so patches read well from a distance.
How should I care for DIY embroidered patches after washing to keep colors vibrant?
Care for DIY embroidered patches by washing gently, inside-out, on a mild cycle, and avoiding high heat. Air dry or use a low tumble dry setting. If you used iron-on backing, reinforce the edges with a few stitches to preserve longevity.
| Aspect | Summary |
|---|---|
| What are DIY embroidered patches? | Small motifs embroidered on fabric with a sturdy backing; can be sewn-on or iron-on; designed for jackets, jeans, bags, and more; installed using various backing methods. |
| Materials & Tools | Core items include fabric base, stabilizer, embroidery threads, needle and hoop, scissors, and backing options; optional sewing machine and specialty threads for effects; markers and transfer tools help design transfer. |
| Design & Planning | Start with a concept or sketch, keep designs simple for beginners, choose stitches (satin, backstitch, stem, long-and-short), and plan a cohesive color palette. |
| Transferring Design | Use tracing, transfer paper, or templates; place stabilizer on the back, then trace with water-soluble markers for clean lines. |
| Embroidery Steps | Prepare fabric and stabilizer, transfer design, stitch (edge satin stitch for boldness; backstitch/split stitch for details), add color/shading, finish edges, and apply backing. |
| Backing Options | Sew-on patches for durability; iron-on patches for quick application; reinforce with machine stitching if laundering is expected. |
| Design Ideas | Initials or nicknames, floral/geometric motifs, hobby icons, travel patches, or quotes to reflect personality. |
| Placement & Application | Plan layout on the garment, place larger patches first, then fill with smaller patches; typical spots include sleeves, chest, back, or bag panels. |
| Care & Longevity | Choose colorfast threads; hand-wash or gentle machine cycle; reinforce edges to prevent peeling; turn garments inside out for washing. |
| Common Mistakes | Using stretchy fabrics without stabilization; over-stitching on small patches; skipping backing prep; rushing transfers. |
| Pro Tips | Use high-contrast color palettes for readability, test specialty threads on a scrap, trim threads cleanly, and press patches flat after finishing. |
| Plan & Process | From theme to patch: sketch, choose base and stabilizer, transfer design, stitch with appropriate techniques, finish edges, attach, and care for longevity. |
Summary
DIY embroidered patches offer a structured path to personalizing clothing and gear, blending design ideas with practical stitching steps. By selecting the right materials, choosing suitable backing, and following a mindful transfer and embroidery process, you can create durable patches that reflect your style. Start with a simple patch to build confidence, then expand your collection with more complex designs and varied shapes to tell your unique story.