
Custom Embroidered Patches Design invites you to blend craft and concept into wearable art. From backpacks to jackets, the right patch can tell a story that boosts brand identity, including the allure of custom embroidered patches. This introductory guide blends practical patch design tips with production realities to show how to design embroidered patches that pop. By focusing on color, size, backing, and stitch choices, you’ll learn embroidered patch design ideas that read well at a glance. And whether you’re styling patches for clothing or gear, you’ll discover how to design patches for clothing that stay durable through wear and washes.
Beyond the phrase Custom Embroidered Patches Design, you can think of this work as bespoke sewn patches, embroidered badges, or garment emblems. Each accessory acts as brand storytelling, a patch artwork that communicates identity on fabric. Effective planning touches on layout, color theory, stitch density, and backing—concepts that align with familiar patch design tips. By using terms like garment embellishments and applique patches, you broaden the semantic reach and improve discoverability for readers and search engines.
Custom Embroidered Patches Design: Laying the Foundation with a Strong Brief
A clear brief anchors your Custom Embroidered Patches Design. Define who wears the patch, the message it conveys, the garment type, and the intended placement. Specifying size, shape (circle, shield, or custom contour), and backing needs early on helps guide the rest of the design process and aligns with patch design tips for consistent results across products.
Translating this brief into visuals means prioritizing legibility and brand language. Keep the design simple enough to read at small scales, choose a restrained color palette, and plan typography that stays readable on fabric. When you pursue how to design embroidered patches, this planning stage sets the foundation for successful embroidery and strong results in custom embroidered patches.
Patch Design Tips that Elevate Readability and Brand Identity
Effective patch design tips start with readability, contrast, and edge treatment. Ensure outlines and color blocks remain clear from a distance, and choose backing and stitch types that hold up under wear. This approach supports design patches for clothing by maintaining legibility on varied garments.
Brand identity matters. Align the motif, typography, and color family with your logo system to strengthen recognition. By thinking about embroidery constraints early, you can craft embroidered patch design ideas that translate well across fabrics and sizes, reinforcing your patch’s role in the broader custom embroidered patches ecosystem.
How to Design Embroidered Patches: From Concept to Production
From concept to production, this is where digitizing and stitch planning come into play. Discuss your preferred stitch types—satin borders for clean edges, fill stitches for color blocks, and occasional running stitches for delicate outlines. The goal is to keep the design faithful while optimizing for stitch count and fabric behavior.
Collaborate with a digitizer early and test at actual sizes to ensure scale reads well. This stage answers questions about density, underlay, and stitch length, which are common considerations in how to design embroidered patches and in refining embroidered patch design ideas for fabric realities.
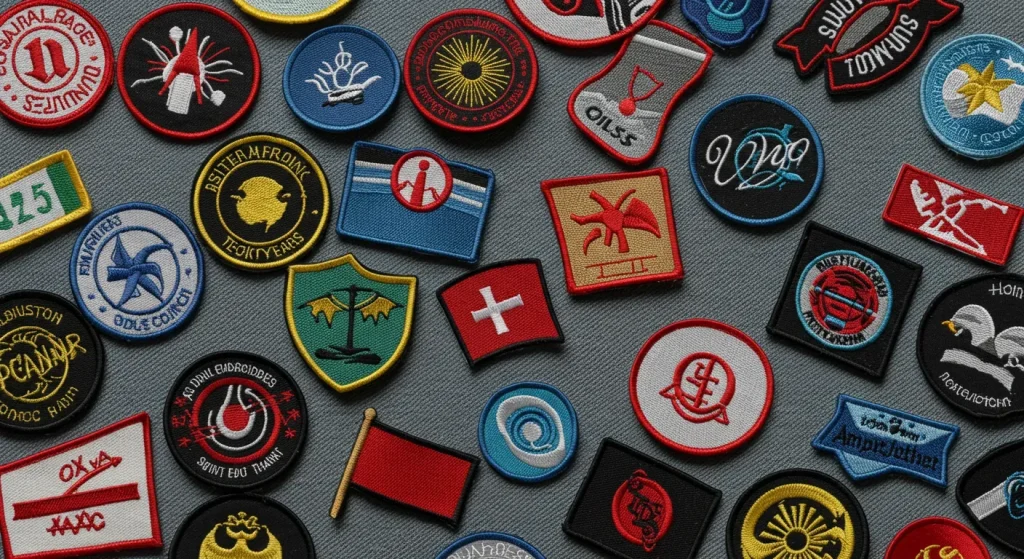
Embroidered Patch Design Ideas for Diverse Applications
Embroidered patch design ideas work across sportswear, corporate uniforms, and lifestyle brands. A cohesive set might reuse a central shape while rotating imagery for different divisions or product lines, maintaining brand cohesion while offering variety. These concepts map naturally to design patches for clothing.
Think about application contexts—hats, jackets, bags—when generating ideas. Create a library of patches at standard sizes and shapes so production remains efficient, and collect feedback from wearers to refine your embroidered patch design ideas.
Color Strategy and Thread Management for Durable Patches
Color strategy starts with a core palette and deliberate accents. Choose threads with good colorfastness and plan for outlines and fills that stay legible on multiple garments. This careful color management is essential for durable custom embroidered patches across products.
Practice color testing across fabrics—knit versus woven, light versus dark—to avoid mismatches in production. By limiting color changes and planning a consistent thread library, you can achieve reliable patch design results and maximize impact of embroidery on clothing.
Production Realities: Backings, Edges, Sizing, and Quality Control
Backings define how patches attach and how they wear. Sew-on backs are traditional, while iron-on or combination backs offer flexibility for different customer needs. Choosing the right backing influences edge finish, wash durability, and overall performance of design patches for clothing.
Quality control is the final gatekeeper. Start with pre-production samples, check alignment, color accuracy, backing adhesion, and edge finish. Clear communication with vendors and early testing reduces rework and ensures Custom Embroidered Patches Design translates faithfully into the final product.
Frequently Asked Questions
What is Custom Embroidered Patches Design and how can patch design tips improve your results?
Custom Embroidered Patches Design defines creating tailored patches through embroidery, from initial concept to finished product. Patch design tips help by guiding brief creation, sizing, shapes, thread density, and backing choices so your patches communicate the right message. Used well, it results in high-quality custom embroidered patches that look great on garments.
How do you design embroidered patches for clothing within the Custom Embroidered Patches Design process?
In the Custom Embroidered Patches Design workflow, start with a clear brief and then translate the concept into scalable patch size, shape, and color plan. Think about how the design will read on clothing and across different materials, and plan production constraints early. Work with a digitizer to optimize stitch types and density so the final embroidered patches for clothing match the concept.
What are some embroidered patch design ideas to maximize impact across different fabrics?
Embroidered patch design ideas include bold, simple icons; high-contrast outlines; restrained color palettes; and versatile shapes like circular, shield, or custom contours. Keep typography minimal and legible, and ensure the design scales well from a sleeve to a chest patch. These ideas help maintain impact across apparel and merchandise.
What patch design tips are essential for readability and durability in Custom Embroidered Patches Design?
Essential patch design tips for readability and durability: use appropriate stitch density, underlay stitches, and a durable backing; choose threads with good colorfastness; keep outlines clear and avoid tiny details that wash out. Test your design on the actual garment fabric and consider edge finishes such as merrowed or laser-cut to match the product. This aligns with Custom Embroidered Patches Design and design patches for clothing.
How should you approach color strategy in Custom Embroidered Patches Design to ensure consistency across products?
Color strategy in Custom Embroidered Patches Design should start with a restrained palette and use high-contrast accents for emphasis. Select colorfast threads and test color stability across fabrics to maintain consistency on all patches. Create a standard color reference to ensure uniform appearance across products and seasons.
What common mistakes should you avoid when designing patches for clothing using patch design tips, and how to design embroidered patches effectively?
Common mistakes when designing patches for clothing include too much detail at small sizes, poor readability, wrong backing choices, and color mismatches. Avoid by producing a pre-production sample, requesting swatches, and performing wash tests; follow patch design tips to anticipate production constraints and reduce rework.
| Aspect | Key Points |
|---|---|
| Overview of Custom Embroidered Patches Design | – Design is a blend of art and technique. – Focus on Custom Embroidered Patches Design balances creativity with production realities (thread choices, backing options). – Provides actionable steps and pro tips from concept to finished product for patches on backpacks, jackets, uniforms, or boutique apparel. – Goal: master fundamentals of patch design tips to make patches stand out. |
| Understanding the Brief | – Start with a clear brief: identify target audience and the message/identity to convey. – Define size and shape suitable for the garment. – Emphasize simplicity for readability at small scales. – Guide color choices, typography, and imagery toward resonance with the audience. |
| Sizing, Shape, and Density | – Size matters: too small loses detail; too large can overpower the garment. – Use standard sizes for common garment areas (left chest, sleeve, hat). – Choose shapes that suit the motif (circular, shield, rectangular; custom contours for logos). – Consider embroidery density: moderate for iconic shapes, higher for intricate logos; ensure readability at target size. |
| Color Strategy and Thread Management | – Start with a restrained palette, add accents for contrast. – Use threads with good colorfastness; test across materials for consistency. – Plan outlines and fill variations; bold outlines help on light fabrics, pale outlines on dark fabrics. – Account for thread limits and satin stitch density to avoid fraying and dull finishes. |
| Digitizing and Stitch Types | – Digitizing converts artwork to stitch instructions. – Satin stitches create clean borders; fill stitches define color blocks; running stitches add delicate outlines. – Ensure cohesive stitching that holds at various scales. – Pro tips: adjust stitch lengths for small details, avoid overly dense fills, use underlay; involve digitizer early. |
| Backing, Adhesive, and Finishing Options | – Backings affect attachment method and garment feel: sew-on, iron-on, or combination. – Edge finishes: merrowed edges for durability; laser-cut edges for sleek silhouette. – Align backing choice with durability, washability, and intended use; coordinate with production team. |
| Size, Context, and Application | – Jacket and bag patches benefit from larger sizes and bold color blocks; uniforms/hats benefit from smaller patches with clear outlines. – Patch position (left chest, sleeve, shoulder) affects perception. – Plan test placements to avoid seams/hardware interference; build a library of standard sizes/shapes for efficiency. |
| Typography and Imagery | – Ensure typography remains legible at target size; avoid overly decorative fonts for small patches. – Prefer bold sans-serif or compact display fonts. – Simplify imagery to preserve recognition when reduced. – Maintain a clear hierarchy: primary emblem, secondary wording, then decorative elements. |
| Quality Control and Production Realities | – Start with a pre-production sample to verify alignment, color accuracy, and edge finish. – Check thread tensions, density, and backing adhesion under wear conditions. – Request color swatches and a prototype before full production to minimize rework. – Communicate production adjustments early and maintain clear guidelines. |
| Creative Inspiration and Industry Trends | – Stay inspired by portfolios and patch collections; note trends in motifs, colors, and shapes. – Blend timeless emblematic elements with contemporary palettes and textures to reflect brand identity. – A patch’s storytelling at a glance strengthens recognition across applications. |
| Case Studies and Practical Scenarios | – Use a unified shape and color family for a multi-division line; vary imagery per division while keeping cohesion. – For premium feels, explore enamel-inspired textures via thread choices and finishes. – These scenarios show translating concepts into effective Custom Embroidered Patches Design with balance of identity, legibility, and feasibility. |
| Cost Considerations and Sourcing | – Higher stitch counts raise cost and time but enable detail; optimize by reducing color changes, minimizing background fills, and standardizing backs. – When sourcing, request samples, check lead times, minimum order quantities, and wash tests. – Scalability without sacrificing quality marks successful design patches for clothing programs and merchandise. |