
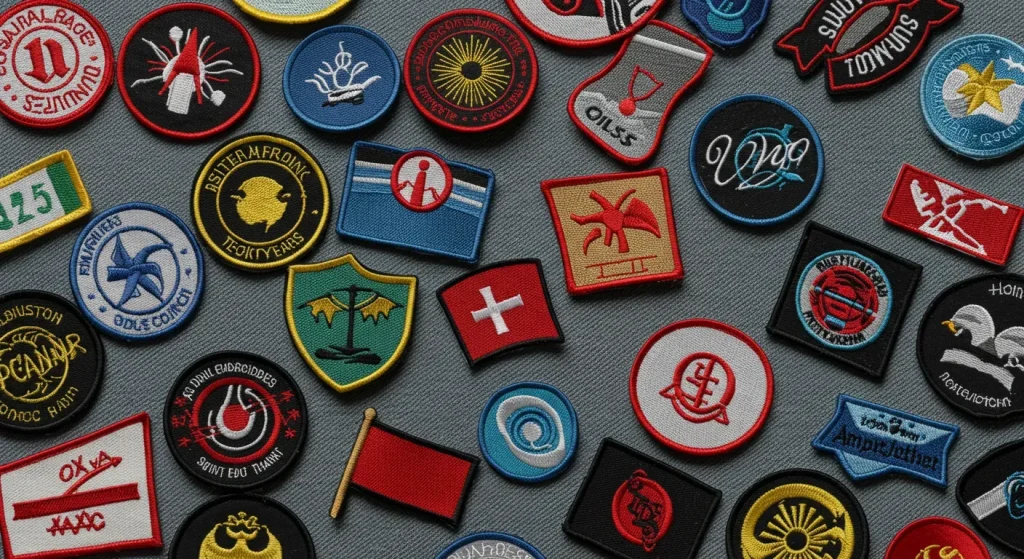
Design Custom Embroidered Patches that stand out isn’t just about pretty artwork; it’s about translating a brand, hobby, or team into wearable identity that resonates with customers from the first glance. When patches appear on a jacket, backpack, or cap, you’ll benefit from insights into designing embroidered patches, as they tell a story at a glance while becoming durable branding assets that endure through repeated wear and washing. Getting this right requires thoughtful decisions about materials, stitch counts, backing options, and, most importantly, the message you want the patch to convey, along with collaborating with vendors to balance cost and color availability. In this guide, you’ll learn practical steps to design patches that are visually striking, durable, and true to your goals, while supporting patch branding strategies and ensuring your approach scales from samples to full production. As you explore color and texture and how finishing affects wear, you’ll gain a framework that can translate ideas into wearable identifiers and reinforce a cohesive brand narrative across products.
In other words, this field covers embroidered badges, sewn-on emblems, and fabric patches that serve as wearable branding for clubs, teams, and companies. Think of these as small, durable insignias—crafted with thread and backing—that convert apparel into a canvas for identity. The same principles apply whether you’re designing a badge for a youth team, a corporate swag line, or a fan club, with attention to legibility, color contrast, and durability. Using terms like emblem patches, badge embroidery, and textile branding helps align creative ideas with production workflows and search intent, making content relevant to designers and buyers alike. By exploring variations such as woven patches, sew-on emblems, and iron-on transfers, you can map a flexible approach that suits both short runs and large-scale campaigns.
1) Design Custom Embroidered Patches: Aligning Goals, Audience, and Messaging
Designing patches that resonate isn’t just about artwork; it’s about translating a brand, hobby, or team into wearable identity. By clarifying the patch’s purpose—whether it serves as a branding asset, a reward for achievement, or a limited-edition collectible—you set the direction for size, level of detail, and the backing you’ll use. This alignment makes it easier to craft patches that stand out for the right reasons and to speak directly to the people you intend to reach. In practice, this means thinking through the messaging, audience expectations, and how the patch will travel with wearers in real-world use.
As you define the goal, consider how it will be perceived across different contexts and products. If you’re aiming for broad appeal, prioritize clean lines, legible text, and high-contrast colors. For niche communities, you can incorporate symbolism, texture, and subtle references that true fans will recognize. This approach ties into broader ideas around designing embroidered patches and patch branding strategies, ensuring your first impression is both distinctive and meaningful.
2) Materials, Size, and Backing: Balancing Durability and Detail in Patch Embroidery Techniques
The material choice sets the patch’s character and how it will endure wear over time. Woven patches can capture fine detail but may appear more delicate, while densely stitched embroidered patches deliver bold texture and stronger longevity. For outdoor gear or workwear, consider heavier fabrics and backings that resist washing and abrasion, yet remain compatible with the garment’s care needs. Understanding backing options—sew-on, iron-on, or Velcro—helps you balance practicality with performance.
Patch size should strike a balance between visibility and practicality. Typical widths range from 1.25 to 3 inches, with nonstandard dimensions used for neck tags or hats when needed. Translate artwork into stitch counts and thread density early in the design phase to protect legibility, especially for small text. The goal is a patch that reads well up close and from a distance, maintaining its character through normal wear and laundering.
3) Design Principles: Composition, Color, and Thread for Standout Embroidered Patches
A strong patch starts with thoughtful composition. Favor simple silhouettes and a clear focal point so the eye can settle quickly, which is crucial given the compact size. Beyond shape, color selection drives recognition—use high-contrast palettes and test how threads render on fabric. Screened or printed previews can look different from actual embroidery, so swatches help verify how the final result will appear in real use.
As you refine the design, document practical guidelines for production, such as limiting to 3-4 main thread colors with 1-2 accents to preserve clarity. You’ll often see references to designing embroidered patches and patch typography in practice as you optimize logos and text for compact formats. This discipline ensures the artwork remains faithful to the brand while staying legible and durable on a variety of garments.
4) Stitch Types, Finishing Options, and Production Realities
Stitch choice forms the backbone of every patch. Satin stitches provide crisp letter edges and bold borders, while fill stitches handle larger color blocks with smooth texture. For intricate logos, blending satin with small fill stitches can preserve legibility without sacrificing detail. Keep an eye on stitch counts: overly dense patches can be stiff, while too sparse patches may wear poorly over time.
Finishing options—merrow borders, heat-cut edges, iron-on backings, plain sew-on, or Velcro—shape the patch’s use-case and durability. For a lightweight, flexible patch, a merrow border with a light backing may be ideal; for a premium feel, consider twin-needle borders and subtle text textures. These choices influence appearance, production cost, and lead times, so balance aesthetics with feasibility to ensure reliable results.
5) Color Theory and Brand Consistency Across Batches
Color is a language that communicates at a glance on patches. High-contrast palettes improve visibility and recognition, while harmonious combinations help convey cohesive brand identity. When selecting thread colors, consider both the fabric background and typical garment choices where the patch will live. Testing multiple colorways reveals how hues interact under different lighting and textures.
To scale patches consistently, settle on a limited color palette and document exact thread color codes. This practice helps maintain uniformity across machines and production lots, supporting reliable outcomes in large runs. If you’re collaborating with others, detailed color specifications prevent drift and ensure that every batch aligns with your patch branding strategies and visual guidelines.
6) Artwork Preparation, Production Workflow, and Quality Control for Reliable Patches
Prepare artwork as scalable vector files with clean outlines, and convert text to outlines to prevent font changes during setup. Separate color layers for each thread color to minimize misregistration and speed up stitching. A well-prepped file reduces production surprises and shortens lead times, guiding the team from concept to swatch tests and onward to the final run.
In the production workflow, include quick mockups to validate shapes and colors before committing to a full run, and accompany artwork with notes about patch shape (round, shield, square) and backing choices. Quality control should verify stitch density, border evenness, and backing security, ensuring that each batch meets standards for durability and legibility. A standardized QC checklist helps ensure patches remain faithful to the original design while performing reliably in real-world wear.
Frequently Asked Questions
How can you kick off Design Custom Embroidered Patches projects to align with your brand and audience?
Start by defining the goals and audience for Design Custom Embroidered Patches. Decide whether the patch serves as branding, a rewards badge, or a collectible, then choose an appropriate size and backing. Select durable materials, a high-contrast color palette, and translate the artwork into a stitch plan. Test swatches on typical fabrics to verify legibility and ensure the design supports your patch branding strategies.
What are some custom embroidered patch ideas to create standout embroidered patches for a club or team?
Consider ideas like a bold mascot emblem, a milestone badge, a simple shield with strong typography, a rotating event banner, or a minimalist silhouette with a color accent. Prioritize high contrast and legible text at small sizes, and tailor the backing and size to suit jackets, bags, or caps for maximum impact.
Which patch embroidery techniques best balance detail and durability for professional uniforms?
Key techniques include satin stitches for crisp edges on letters and borders, and fill stitches for larger color blocks. Combine these techniques thoughtfully to preserve legibility, then choose finishing options such as merrow borders or appropriate backings to fit the garment’s use and care. Test density and stitch count to ensure durability over time.
How can you integrate patch branding strategies into designs to create standout embroidered patches?
Embed your brand identity through consistent color palettes, typography, and logo treatment. Position patches strategically on garments, and plan packaging and labeling that reinforce brand storytelling. Align every design choice with long-term brand recognition to achieve cohesive patch branding strategies.
What design considerations are important when designing embroidered patches for different fabrics and backings?
Choose materials and backing options that match the fabric and care needs of the garment. Heavier fabrics can support denser stitching, while iron-on backings might affect washability. Ensure the design remains legible at target sizes and select backings that suit the patch’s intended wear and cleaning routine.
How should artwork and color plans be prepared when designing embroidered patches to ensure quality production?
Prepare vector artwork with clean outlines, convert text to outlines, and separate color layers for each thread color. Include notes on patch shape and backing to guide production, and generate stitch files after testing swatches. A clear design-to-production workflow helps deliver Design Custom Embroidered Patches that are accurate in color and detail across batches.
| Topic | Key Points |
|---|---|
| Introduction |
|
| 1) Define goals and audience |
|
| 2) Materials, size, and backing |
|
| 3) Design principles: composition, color, and thread |
|
| 4) Stitch types and finishing options |
|
| 5) Color theory and contrast |
|
| 6) Artwork preparation and production workflow |
|
| 7) Quality control and durability |
|
| 8) Branding, usage, and real-world cases |
|
Summary
HTML table explaining key points of the base content in English.