
DIY DTF studio setups empower you to control quality, timing, and design freedom from day one. With the right DTF printing supplies and a clear workflow, you can translate your ideas into vibrant, durable transfers. A budget-conscious approach helps you balance cost and capability as you work toward reliable results using a DTF heat press and DTF transfer film. Starting small, you can validate designs, build a steady process, and grow your budget DTF studio into a scalable side business. This guide shows you how to start DTF printing with practical supplies, a simple budget, and a plan that keeps quality at the forefront.
For creators seeking a hands-on, at-home garment transfer project, a home-based DTF workshop offers a compact, controllable workflow that puts customer-ready results within reach. Framed as a modern digital textile workflow, it blends film, powder, and heat-press steps to produce custom apparel on demand. The approach favors affordable tooling, incremental upgrades, and a repeatable process that translates art into wearable transfers. By starting with essential supplies and clear processes, you can scale your operation while maintaining quality and consistency.
Getting Started: Building a Practical DIY DTF Studio on a Budget
Launching a DIY DTF studio makes sense for creators who want control over quality, timelines, and design experimentation. A well-planned setup can stay within a modest budget while still delivering professional transfers. Framing your project as a budget DTF studio helps you prioritize essential tools and reliable workflows from day one.
To get started, map a dedicated workspace, estimate a practical equipment budget, and identify the key DTF printing supplies you will rely on daily. The goal is to validate your workflow with inexpensive, dependable gear before expanding, and this is a practical guide on how to start DTF printing without breaking the bank.
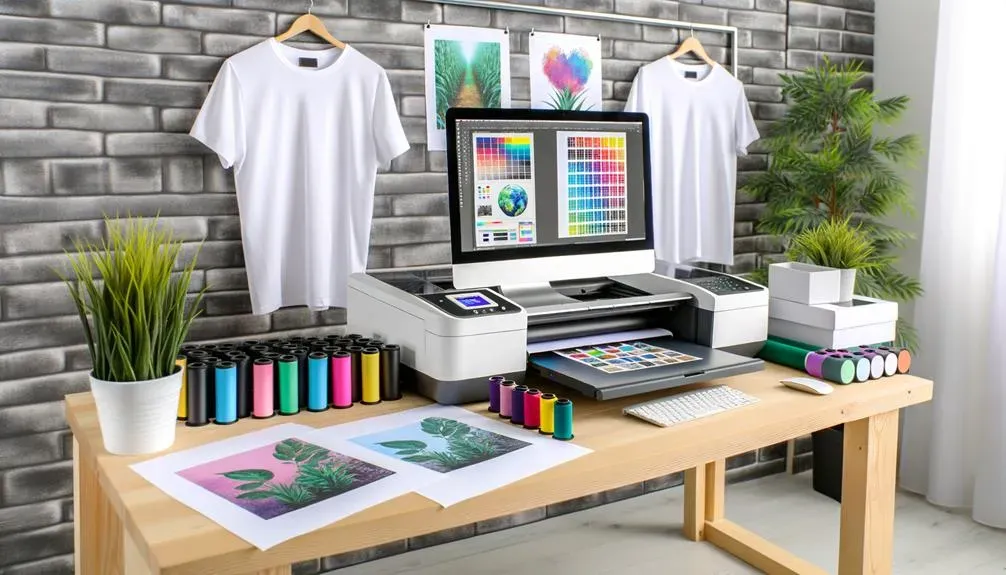
Essential DTF Printing Supplies: Core Tools You Need for Reliable Transfers
Core tools include a DTF printer with white ink capability, compatible DTF transfer film, adhesive powder, curing equipment, a reliable heat press, and design software. These DTF printing supplies form the backbone of a steady, repeatable process and help you deliver consistent results to customers.
Beyond the basics, organize your workspace with proper storage and protection. PPE and ventilation keep you safe during powder handling and pressing, while labeled containers reduce cross-contamination and speed up order fulfillment.
Design to Print: A Descriptive Workflow-Focused DTF Process
From concept to garment, this workflow centers on color accuracy and reliable transfer adhesion. Start with design files that use color-managed processes, then prepare the film with aligned printing and print settings tuned for white ink deposition and vibrant color on transfer film.
Powdering and curing are performed in a controlled sequence, followed by preheating the garment and pressing with calibrated temperature, time, and pressure. Finishing, post-press handling, and QA checks close the loop, ensuring every order meets your quality standards.
Choosing a DTF Heat Press and Transfer Film for Consistent Results
Selecting the right DTF heat press and transfer film is critical for consistent results. Look for adjustable temperature and time, even platen pressure, and reliable safety features. Pair this with a transfer film designed for clean edges and strong adhesion to avoid ghosting or color bleeding.
Testing different film thicknesses and ink combinations helps you optimize edge sharpness and color fidelity on your target fabrics. Keep notes about activation temperature and transfer force, so your team can repeat the perfect transfer across batches.
Scaling Your DIY DTF Studio: Upgrades, Throughput, and Future Growth
Scaling a DIY DTF studio means planning for throughput and reliability. Start with a solid baseline: a second heat press or larger platen, if your budget allows, plus a dedicated curing solution to speed powder processing and reduce bottlenecks.
Budget-conscious growth focuses on reinvestment into higher-quality transfer film, upgraded printers, and additional RIP licenses only as demand justifies them. A modular setup lets you add tools without disrupting current production.
Quality Control, Troubleshooting, and Customer Satisfaction
Quality control and troubleshooting are built into a repeatable QA checklist. Common issues include uneven white ink deposition, powder adhesion problems, and incomplete transfers. Establish standard operating procedures to diagnose and fix these quickly. If you are learning how to start DTF printing, this QA mindset helps prevent costly mistakes.
Customer communication, clear care instructions, and transparent lead times reinforce professionalism. Document results, track feedback, and maintain a tidy, well-ventilated workspace so returns and misprints are minimized.
Frequently Asked Questions
What is a DIY DTF studio and how can I start DTF printing at home?
A DIY DTF studio is a small, home-based setup that lets you design, print, powder, cure, and press transfers for textiles using DTF transfer film. To start, focus on essential DTF printing supplies and a sensible budget. Build a basic workflow around a reliable DTF printer with white ink, DTF transfer film, adhesive powder, a heat press, and basic PPE. Create a dedicated workspace and plan a simple process from design to finished product to keep quality consistent as you scale.
What essential DTF printing supplies do I need to outfit a budget DTF studio?
Core items include a DTF printer with white ink capability, a heat press, DTF transfer film, white and color inks suitable for DTF, adhesive powder, a curing option, a sturdy work surface, ventilation, and basic design software. Start with essential tools and a modest stock of consumables, then validate your workflow before expanding. A typical budget DTF studio can begin in the rough range of $1,000 to $2,500 when used equipment is considered.
How should I choose the DTF transfer film for a DIY DTF studio?
Choose DTF transfer film based on thickness, clarity, and compatibility with your printer ink system. Look for clean edges, vibrant color transfer, and consistent powder adhesion. Test a few trusted suppliers and maintain a small stock of backup films to prevent delays. Keep a note of film compatibility with your chosen DTF printing supplies to ensure reliable results.
What is the recommended workflow for a DIY DTF studio from design to finish?
Design and prepare artwork with color management. Print preparation by loading the transfer film and calibrating printer settings for robust white ink deposition. Powdering and curing after printing to ensure even adhesion. Finishing and pressing with proper temperature, time, and pressure. Post press handling and quality control to check adhesion and appearance, followed by packaging for shipping. A repeatable workflow helps maintain consistent results in your DIY DTF studio.
How can a DIY DTF studio scale production without breaking the budget?
Start with essential tools and consider slightly used equipment to reduce upfront costs. Plan a scalable layout and workflow that can add a curing station or extra heat press as demand grows. Budget for consumables and keep a simple inventory. As orders increase, add a second printer or upgrade to higher quality DTF transfer film, and expand RIP licenses to minimize downtime.
What maintenance and QA practices should I implement in a DIY DTF studio to maintain quality?
Establish a routine maintenance schedule for the printer, heat press, and curing equipment, and use a simple QA checklist for every batch. Address common issues such as uneven white ink deposition, powder adhesion problems, and poor fabric transfer by checking printer calibration, film alignment, drying, and pressing parameters. Maintain ventilation and PPE, document outcomes, and adjust workflows to sustain consistent results in your DIY DTF studio.
| Topic | Key Points | Notes / SEO Keywords |
|---|---|---|
| Introduction | DIY DTF studio gives you control over product quality, turnaround times, and allows experimentation with new designs; suitable for small home businesses, side-hustlers, or hobbyists; goal is to balance quality with cost; plan for reliable tools and a smooth workflow without overspending. | Keywords: DIY DTF studio, start DTF printing from home |
| Core Tools and Consumables (Core equipment & consumables) | DTF printer with white and color inks; DTF transfer film; white and color inks suitable for DTF; adhesive powder and curing equipment; heat press; work surface and storage; PPE and ventilation; basic design software and color-accurate monitor. | Keywords: DTF printing supplies, DTF heat press |
| Optional Upgrades | Conveyor dryer or curing chamber; extra heat presses or larger platen sizes; a second printer or backup unit. | Keywords: budget throughput, scalability |
| Workflow-friendly Setup | Dedicated ink and powder stations; clean, well-lit area; power outlets arranged to support equipment; simple racking for films, powders, and garments to speed packing/shipping. | Keywords: workflow efficiency |
| Budgeting & Setup Planning | Start with essentials (printer and heat press); space plan (e.g., 6×8 ft); scalable path; cap initial costs; starter budget range: $1,000–$2,500; reinvest profits into upgrades. | Keywords: budget DTF studio, space planning |
| Designing Your Efficient DTF Workflow | Design/artwork with color management; print prep with proper alignment; powdering & curing; finishing and pressing; post-press handling; QA packaging. | Keywords: DTF workflow, color-managed design |
| Choosing & Sourcing DTF Transfer Film & Supplies | Assess film quality (thickness, clarity, compatibility); ensure even powder adhesion; work with trusted suppliers; maintain backups. | Keywords: DTF transfer film, powders, film quality |
| Maintenance, Troubleshooting & QA | Routine maintenance; QA checklist; common issues and fixes (uneven color, powder adhesion problems, poor fabric adhesion, heat press safety) | Keywords: QA, troubleshooting, maintenance |
| Starter Budget & Growth Path | Starter budget example: $1,330–$2,670 (depending on sourcing quality and used gear); growth options include second heat press, larger platen, dedicated curing; upgrade films or add printer/RIP licenses | Keywords: starter budget, growth path, budget DTF studio |
| Safety & Professionalism | Maintain a clean, organized space; label consumables; PPE and ventilation; secure hot surfaces; communicate lead times and care instructions | Keywords: safety, professionalism in DTF |
Summary
DIY DTF studio success starts with practical planning and the right toolkit. This includes selecting reliable DTF printing supplies, a dependable DTF heat press, and quality DTF transfer film, all within a sensible budget and a repeatable workflow. If you’re asking how to start DTF printing, begin with essential tools, a clean workspace, and QA-driven processes, then scale as demand grows. With careful planning, consistent execution, and clear customer communication, your DIY DTF studio becomes a reliable source of custom apparel and a hub for creative experimentation.