
UV DTF transfer opens a world of vibrant, print-ready designs you can create at home. As a beginner-friendly option, UV DTF printing lets you translate artwork, logos, or quotes onto apparel with high resolution. This guide covers what UV DTF transfer is, the materials you’ll need, and a step-by-step workflow that keeps the process approachable. With practice, you’ll achieve durable results on T-shirts, hoodies, totes, and more, making DIY t-shirt printing both fun and feasible. Whether you’re testing designs or building a small at-home setup, this Beginner’s guide to DTF helps you start quickly and improve steadily.
Beyond the exact label UV DTF transfer, think of this as a film-based, UV-ink transfer onto fabrics, a modern approach to print-on-film. You can describe it as a digital-to-fabric process that uses UV-curable inks on a carrier sheet, then applies with heat to seal the image. This DTF transfer tutorial shows how the same concept translates to smaller runs and DIY t-shirt printing, offering sharp detail and durable color. For readers seeking alternatives, many designers view it as a DTF printing vinyl alternative that pairs well with cotton and blends, providing fast curing and strong adhesion.
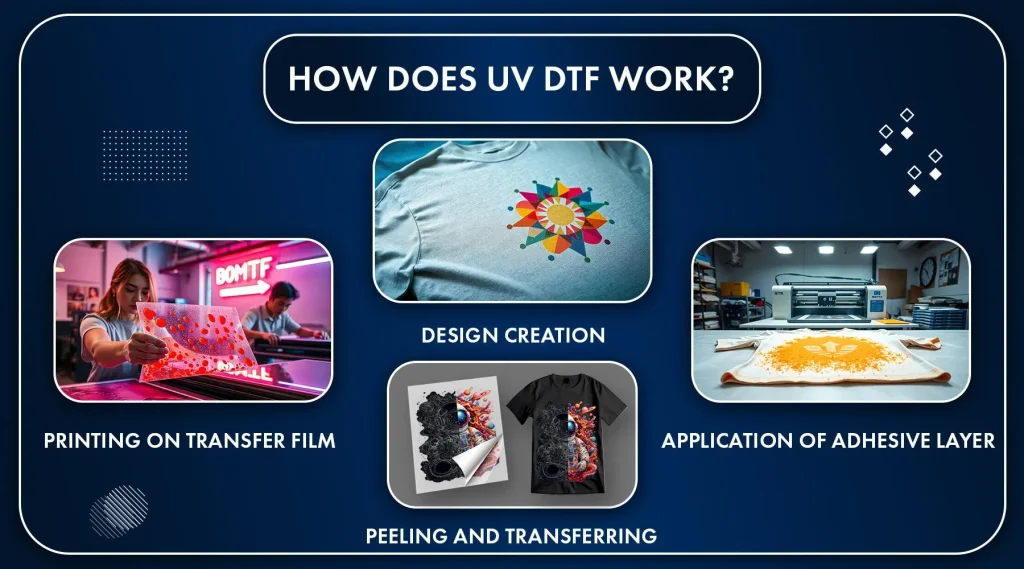
Understanding UV DTF transfer: A Beginner-Friendly Overview
UV DTF transfer combines direct-to-film printing with UV-curable inks, delivering vibrant, photo-like results on fabric. For DIY t-shirt printing, this approach offers a relatively straightforward workflow and quick curing that suits beginners who want pro-looking results. As a practical entry into the world of UV DTF printing, it aligns with what many consider a Beginner’s guide to DTF, while staying accessible for hobbyists and makers exploring DIY tees.
The result is high-resolution color reproduction and durable adhesion when correctly cured. Compared to traditional screen printing or larger-format DTG, UV DTF transfer can be a DTF printing vinyl alternative for small runs and customizable designs. It’s a practical first step for crafters who want sharp edges and bright hues without a bulky setup.
Selecting Materials for UV DTF Printing DIY Tees
The core UV DTF printing toolkit includes UV DTF transfer film or sheets, UV-curable inks (or a dedicated UV DTF printer), a heat press, and protective layers like parchment paper. For those exploring “DTF printing vinyl alternative” options, many vendors offer ready-to-transfer sheets that simplify the workflow. The kit should also include cutting tools, masking tape, and a clean workspace suitable for DIY t-shirt printing.
Selecting fabrics with care is essential. Cotton and cotton blends respond well to UV DTF transfers, while poly-blends may require adjusted heat settings and shorter dwell times. Pre-washing the garments removes sizing that could hinder adhesion, and ensuring the fabric is dry helps the transfer adhere evenly during the press. This aligns with the practical considerations discussed in UV DTF printing guides and beginner tutorials.
Step-by-Step Workflow for UV DTF transfer application
Step-by-step, start with a high-resolution design—300–600 dpi—and save as PNG with transparency or a high-quality TIFF. If printing at home, mirror the image to appear correctly after transfer. This setup mirrors tips from a DTF transfer tutorial and resonates with the beginner-friendly tone of a Beginner’s guide to DTF, especially for those new to DIY t-shirt printing.
Next, cut away excess white space while preserving a slim margin to maintain edge definition. Prepare the garment with a pre-press to remove wrinkles and moisture, then position the transfer with the printed side down. Securing with masking tape ensures the image stays aligned during the heat press portion of the UV DTF transfer workflow.
Heat and dwell settings vary by brand, but a typical range is 320–340°F (160–170°C) for 12–20 seconds with moderate pressure. Calibrate for your fabric by testing on a swatch first, then proceed with the full print. This step-by-step approach reflects the practical UV DTF transfer tutorial mindset and supports consistent results in DIY t-shirt printing projects.
Optimizing Color and Detail: Achieving High-Resolution UV DTF Results
Achieving crisp edges and rich color relies on printing at high resolution and managing color depth. UV inks deliver sharp lines and smooth gradients with less bleeding, which is important for t-shirt designs that include fine text or photo-real imagery. Using proper color profiles and calibration helps you harness the true potential of UV DTF printing.
To ensure consistency, pre-test on a similar fabric swatch and keep press times uniform across projects. Maintain the heat press, use transfer films proven compatible with your fabrics, and monitor edge retention as you progress. These practices strengthen your DIY t-shirt printing outcomes and align with the broader goals of the DTF printing vinyl alternative approach.
Troubleshooting Common Issues with UV DTF Printing
Common issues include dim or off-color transfers, peeling edges, crackling textures, or color migration. Dim colors may indicate insufficient contrast or incomplete curing, while lifted edges point to pressure imbalance or moisture. Addressing these involves verifying mirror orientation, stabilizing fabrics, and refining the pre-press and curing steps.
Tackling edge curling requires a cleaner cut, proper alignment, and possibly more dwell time or higher pressure. For bleeding, check the surface for lint and avoid smoothing too aggressively before transfer. Following a tested UV DTF transfer tutorial or beginner’s guide to DTF helps you troubleshoot across your projects without guessing.
Care and Longevity: Washing and Maintaining UV DTF Tees
Post-press care is crucial to preserve vibrancy. Let the garment cool completely, then wash on a gentle cycle inside out and avoid harsh detergents. Waiting 24–48 hours before washing strengthens adhesion and helps the print last longer on cotton and blends.
For longevity, store finished tees away from direct sunlight and high heat, and follow the transfer manufacturer’s care guidelines. Regularly inspect your heat press and clean any residue that could transfer to future projects. Proper care turns a first UV DTF transfer into a durable, wearable art piece for DIY t-shirt printing.
Frequently Asked Questions
What is UV DTF transfer and why is it a good option for DIY t-shirt printing?
UV DTF transfer combines film-based printing with UV-curable inks to produce high‑resolution images on fabric. It’s a strong choice for DIY t-shirt printing due to sharp colors, durability, and a relatively simple workflow compared to traditional screen printing.
How does UV DTF printing differ from traditional DTF transfer?
UV DTF printing uses UV-curable inks and a curing process to fix the image on the transfer, which can offer faster curing and improved edge definition. This differs from traditional DTF, which relies on heat to transfer ink from film to fabric and may involve different color handling.
What materials do I need for a UV DTF transfer DIY project, and can it be a DTF printing vinyl alternative?
Essential items include UV DTF transfer film or sheets, UV-curable inks or a UV DTF printer, a heat press, protective sheets, pre-washed tees, cutting tools, tape, and surface prep cloth. It can act as a DTF printing vinyl alternative for many fabrics, offering a vinyl-like feel with vibrant, durable results.
Can UV DTF transfer be used on dark fabrics, and what steps help maintain color opacity?
Yes, UV DTF transfer can work on dark fabrics, typically with a white underbase or built‑in white layer to preserve color brightness. Proper pre‑press, correct temperature, and adequate curing are key to maintaining opacity and wash durability.
What are common mistakes in a UV DTF transfer workflow, and how can a beginner follow a DTF transfer tutorial to avoid them?
Common issues include insufficient curing, misalignment, air pockets, and edge lifting. Following a detailed DTF transfer tutorial, testing on swatches, and using consistent heat, pressure, and timing helps beginners avoid these pitfalls and achieve pro-like results.
How should I care for garments after applying a UV DTF transfer to maximize durability?
Allow proper cooling and avoid aggressive washing for 24–48 hours. Turn garments inside out, wash on gentle cycles with mild detergent, and avoid high heat or harsh bleaches to preserve bond and color longevity.
| Topic | Key Points |
|---|---|
| What is UV DTF Transfer? | UV DTF transfer blends direct-to-film printing with UV-curable inks. The image is printed on transfer film, cured, then heat-pressed onto fabric to yield sharp edges, bright colors, and good wash durability; UV curing helps reduce smudging and simplifies the workflow versus traditional methods. |
| Benefits for DIY Tees | High-resolution color and detail; strong durability on fabrics; versatile across cotton and blends; beginner-friendly workflow for small projects. |
| Materials & Tools You’ll Need | UV DTF transfer film/sheets; UV-curable inks or a UV DTF printer; heat press; heat-safe protective sheets; pre-washed dry tees; cutting tools; masking tape; cleaning cloth; optional compression mat or test swatches. |
| Step-by-Step Workflow (Overview) | 7-step outline: design/print (at 300–600 dpi, mirror image if needed); cut/trim; pre-press garment; position transfer; apply heat/pressure per transfer specs; peel (warm or cold per product); post-press care. |
| Troubleshooting & Tips | Common issues: dim/off-color transfers, peeling edges, crackling, bleeding. Fixes: adjust heat, time, and pressure; ensure surfaces are clean and fully cured; pre-test on swatches; maintain equipment for consistent results. |
| Care & Longevity | Follow manufacturer care guidelines; wash inside-out with mild detergent; avoid harsh bleaches and high heat; print longevity depends on fabric type and care. |
Summary
UV DTF transfer opens the door to high-quality wearable art for beginners and DIY enthusiasts. This accessible method blends direct-to-film printing with UV-curable inks, delivering vibrant colors, crisp details, and strong wash durability when properly applied. With the right materials, a clear workflow, and careful pre-testing on swatches, you can produce professional-looking tees and other garments at home. Start with simple designs, nail down your pre-press and heat settings, and gradually tackle more complex graphics as you gain experience. UV DTF transfer is a flexible, scalable technique that lets makers of all levels turn artwork into durable, vivid wearable art.