
UV DTF transfer offers a beginner-friendly gateway to vibrant, durable garment decoration. By combining DTF printing concepts with UV-curable inks on a transfer film, it delivers sharp colors and reliable adhesion, aligning with the direct-to-film workflow. For beginners, the workflow—from artwork preparation to heat press techniques—stays straightforward and forgiving. With practical tips on garment design and material choices, you can preview how colors translate across cotton tees, hoodies, and bags. As you practice, this approach helps you move from digital concept to finished garment quickly and confidently.
A different, yet related way to describe this process is as a UV-curable film print method, where artwork is prepared digitally and transferred to fabric via an adhesive-backed film. In SEO terms, many refer to it as a direct-to-film technique powered by UV inks, a contemporary variant within the broader DTF transfer family. Another framing is as a print-on-fabric workflow that emphasizes color fidelity, fast curing, and repeatable results for apparel projects. The approach naturally aligns with common heat press techniques and practical considerations for artwork preparation and fabric selection. Using these LSIs—UV print media, UV ink on film, and garment decoration workflows—helps readers connect to related topics like care, substrate compatibility, and multi-color design.
Getting Started with UV DTF Transfer: From Design to a Finished Garment
Getting started with UV DTF transfer means turning a digital design into a wearable product using UV-curable inks on a transfer film. This beginner-friendly path blends the precision of modern garment design with the reliability of a direct-to-film workflow. By focusing on clear layers, color fidelity, and proper curing, you can achieve vibrant prints that stand up to washing and wear. In the context of LSI, you’ll be speaking the same language as DTF transfer specialists while keeping the process approachable for newcomers.
Workflow basics for DTF printing start with artwork preparation and a print-ready file. Prepare your design in layers so you can toggle features like white underbase on or off during proofing. Then move to film preparation, loading the transfer film into your UV DTF printer, printing, curing, powdering, and finally pressing onto a garment. Keeping a simple, repeatable sequence aligns with good heat press techniques and helps ensure consistent results across multiple garments.
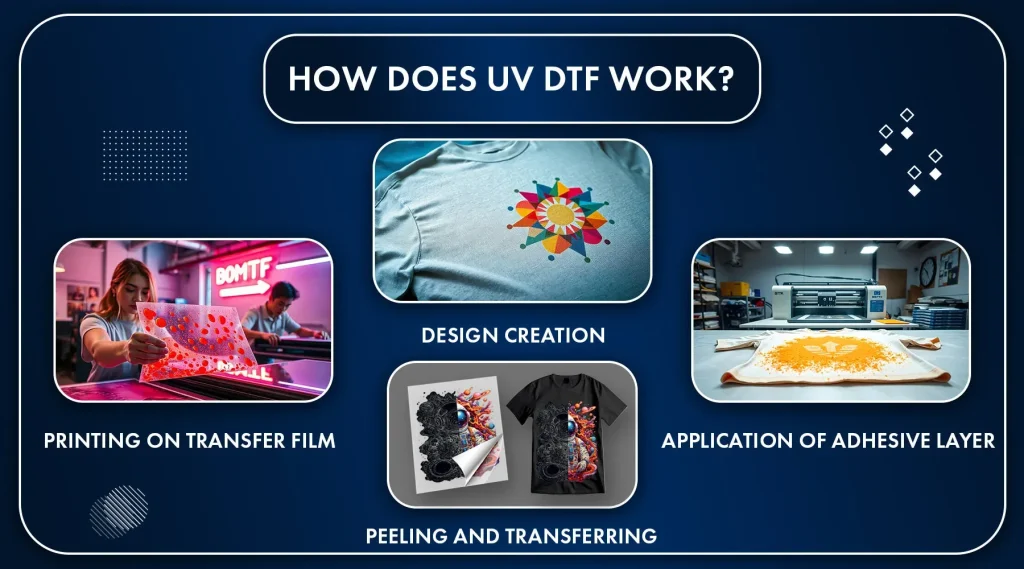
Understanding Direct-to-Film Printing and DTF Transfer for Beginners
Direct-to-film, or DTF transfer, describes the process of printing onto a special film, applying adhesive powder, and heat-pressing the design onto fabric. The UV variant uses UV-curable inks that cure rapidly, delivering bright colors and sharp edges. For beginners, this combination offers a forgiving path to multi-color designs and smooth gradients on a range of fabrics, tying directly into garment design considerations and practical heat press techniques.
DTF printing benefits include strong color fidelity, easy edits before final press, and compatibility with cotton blends and polyester. The workflow often includes building up color layers, curing between steps, and ensuring the transfer film releases cleanly from the garment after pressing. Understanding these steps helps you predict how your artwork will translate from screen to fabric and how to adjust color counts or separations accordingly.
Choosing Materials for DTF Transfers: Film, Ink, and Adhesives
Selecting the right materials is the backbone of successful DTF transfers. Look for transfer film designed for UV inks, compatible with your printer, and capable of delivering crisp lines for garment design. Pair this with UV-curable inks and an appropriate adhesive powder to ensure the printed image adheres cleanly to cotton-heavy fabrics and blends. When choosing materials, consider how heat press techniques interact with the film and ink to produce a durable finish.
Adhesive powders, curing lamps, and compatible heat presses all influence the final result. Test a variety of films and powders on scrap garments to verify color vibrancy, edge definition, and wash durability. Keeping careful notes on which materials work best with your particular fabric type helps you reproduce designs consistently and improves your DTF printing workflow over time.
Mastering Heat Press Techniques for Durable UV DTF Garments
Heat press techniques are central to successful UV DTF transfers. Aim for a balanced approach: preheat the fabric to remove moisture, then press at about 160°C (320°F) for 10-15 seconds with medium to firm pressure. These parameters, while a good starting point, should be adjusted based on your adhesive and film brand. Following the correct temperature and timing helps prevent scorching and color shifting while maximizing adhesion on cotton blends and poly blends.
After pressing, a brief post-press hold can help set edges and ensure a clean transfer. Always verify the peel method (hot, warm, or cold) recommended by your adhesive and film. Respecting heat press techniques for different fabrics—especially when moving from cotton-heavy materials to polyester blends—will reduce edge lifting and ensure a durable, wash-ready finish.
Design Considerations for Garment Design in DTF Printing
Design considerations start with high-resolution artwork (300 dpi or higher) and a practical color count to keep the DTF transfer manageable. In garment design, plan for white underbase on dark fabrics and consider bleed, margins, and print size to avoid crowding on smaller garments. This aligns with best-practice DTF transfer workflows where color management and separations directly affect print quality and consistency.
Layering strategy is essential for multi-color designs. Build artwork in separations that can align with your printer’s capabilities and the UV transfer film’s requirements. Think about how the garment color will interact with each layer, and plan for underbases, shadows, and highlights. Documenting color layers and their order makes future reproductions faster and more accurate.
Troubleshooting Common UV DTF Transfers
Common issues include faded colors, uneven adhesion, and white underbase visibility on dark fabrics. These symptoms often point to problems with adhesive powder distribution, curing, or heat and pressure during the press. By addressing these factors, you can save time and improve results across multiple orders, reinforcing solid heat press techniques and reliable DTF transfer outcomes.
Edge lifting, powder residues, or slight film curling can derail a project if not addressed promptly. Solutions include ensuring even pressure with a properly calibrated heat press, double-checking film cure times, and thoroughly shaking off excess powder before curing. When problems arise, return to a scrap test to fine-tune temperature, time, and peel method, then apply the refined settings to your next garment design.
Frequently Asked Questions
What is UV DTF transfer and how does it relate to DTF transfer and direct-to-film methods?
UV DTF transfer uses UV-curable inks and a curing step to set colors quickly on a transfer film, which is then heat pressed onto a garment. It follows the direct-to-film concept but with a UV cure that can yield sharp, vibrant results and a more forgiving workflow, making it a solid entry point for garment design.
Is UV DTF transfer suitable for beginners in garment design?
Yes. UV DTF transfer is beginner-friendly because it combines a straightforward workflow—design, print on transfer film, powder, cure, and heat press—with bright, durable results on a range of fabrics, including cotton blends.
What equipment and materials do I need to start UV DTF transfer with a heat press?
You’ll need a UV DTF printer or a UV-capable workflow, UV-curable inks, DTF transfer film designed for UV inks, adhesive powder, a heat press with even temperature control, a Teflon or silicone sheet, garments, and artwork software to prepare print-ready files.
How should I prepare artwork for UV DTF transfer to ensure sharp, durable prints?
Prepare artwork at high resolution (300 dpi or higher), outline fonts if needed, design in layers (including a white underbase layer for dark fabrics), and export in widely supported formats (PDF, TIFF, PNG). Use proper color management and ensure color separations align with your transfer film and UV workflow.
What are the key heat press techniques and settings for successful UV DTF transfer?
Preheat the garment for 2–5 seconds, set temperature around 160°C (320°F) with some adhesives requiring 150–170°C, press for 10–15 seconds with medium to firm pressure, and choose hot, warm, or cold peel according to your adhesive. After peeling, apply light post-press pressure for 2–3 seconds to ensure edge adhesion.
What common issues occur with UV DTF transfer and how can I troubleshoot them?
Common issues include faded colors, uneven adhesion, or edges lifting. Troubleshoot by checking proper curing, ensuring even pressure and correct temperature, verifying the garment lies flat, and removing excess adhesive powder. If colors look off, adjust color separations or underbase strength and reproof with a test print on scrap fabric.
| Aspect | Overview | Tips |
|---|---|---|
| What is UV DTF transfer? | UV DTF transfer is a variant of Direct-to-Film that uses UV-curable inks printed on a transfer film, followed by curing, and then heat pressing onto fabric. | A beginner-friendly workflow with vibrant, durable results; ensure proper curing for longevity. |
| Why choose UV DTF transfer for beginners? | Benefits include bright color accuracy and vibrancy, versatility on cotton blends and polyester, a manageable, repeatable workflow, and rework-friendly options. | Start with simple, bold designs; verify heat/time/pressure settings; plan for a white underbase on dark fabrics if needed. |
| Essentials to gather | A UV DTF printer or UV-compatible workflow, UV-curable inks, UV transfer film, adhesive powder, heat press, protective sheets, suitable garments, and artwork software. | Set up a dedicated workspace and run test prints before production. |
| Key design considerations | Resolution (300 dpi or higher), color management (CMYK or RGB with soft proofing), white underbase for light fabrics, bleed/margins, and suitable print size. | Use high-resolution artwork; plan underbase for dark fabrics and test color separations. |
| Artwork preparation | Create or convert print-ready files with clear edges; outline fonts; separate underbase layers; export formats like PDF, TIFF, or PNG. | Keep underbase on a separate layer for proofing; ensure transparency aligns with the transfer film. |
| From design to film: the UV print process | Load the transfer film, print with proper color management; print the white underbase first if used, then color layers, and cure the film. | Keep the film flat during printing; cure thoroughly to lock in color fastness. |
| Powdering and curing | Apply an even layer of adhesive powder, shake off excess, and cure again if required; ensure no clumps. | Remove excess powder and ensure complete curing to prevent issues in production. |
| Transferring to the garment | Preheat garment (2–5 seconds); set temperature around 160°C (320°F); press 10–15 seconds; use medium to firm pressure; peel while warm or as adhesive dictates. | Follow adhesive guidelines; adjust for fabric type; consider a brief post-press to set edges. |
| Care and troubleshooting | Care for UV DTF-transferred garments by turning inside out, washing cold or warm on gentle cycle, and drying on low heat or air dry. | If colors fade or edges lift, recheck curing, adhesion, and pressure; ensure proper film handling and powder removal. |
Summary
UV DTF transfer offers a practical, beginner-friendly path to vibrant, durable prints on a wide range of garments. This overview summarizes the workflow from design preparation to the final press, including material choices, key design considerations, and common troubleshooting tips. By following a straightforward process, beginners can achieve professional-looking results with repeatable success. With careful material selection, proper curing, and consistent transfer techniques, you can turn digital artwork into finished garments that customers will love. Practice, keep notes on settings for different fabrics, and gradually expand to more complex artwork to scale your UV DTF transfer projects.