
UV DTF transfer has reshaped how designers customize textiles and UV transfer on fabric and other surfaces. By combining UV-curing inks with a dedicated transfer film, it blends color depth with precise detail, building on DTF printing techniques and the UV DTF printing approach. This method pairs wide color fidelity with tactile texture, highlighting DTF transfer detail and the importance of color and texture in UV DTF. Designer workflows can leverage reliable curing, film choice, and substrate prep to maximize results. Whether on clothing or hard surfaces, UV DTF transfer delivers sharp imagery, durability, and vibrant color that meets real-world use.
In broader terms, the process can be described as a digital textile transfer using ultraviolet-curable inks applied via a specialized film. From a Latent Semantic Indexing (LSI) perspective, readers might encounter terms like UV-curing printing on fabrics, high-resolution textile graphics, and durable adhesion to various substrates. Alternative phrasing includes direct-to-fabric transfer with ultraviolet inks, surface-ready media, and precise curing to lock in detail. Understanding these semantically related concepts helps designers communicate about color fidelity, texture impact, and production workflows.
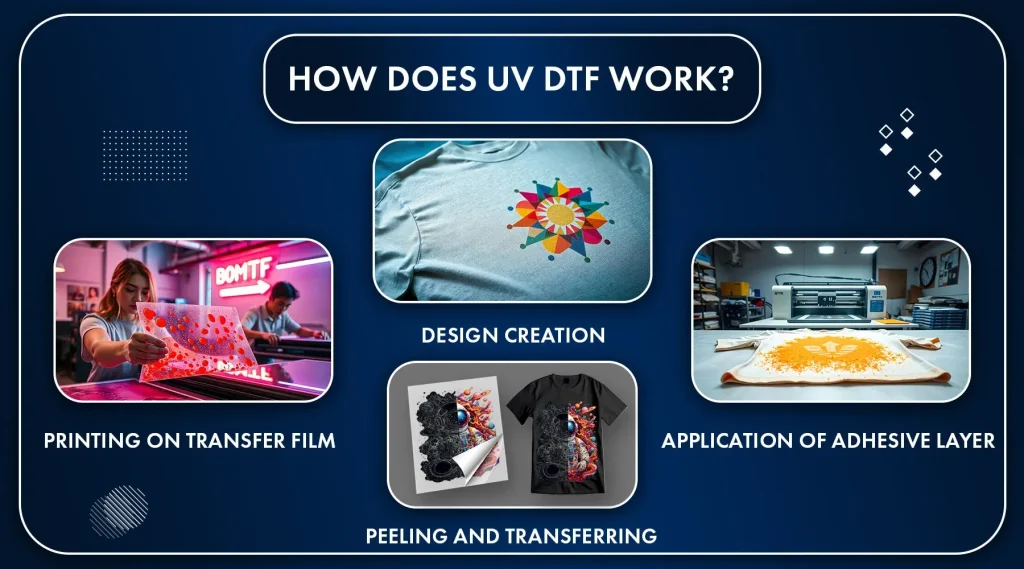
What is UV DTF transfer and Why It Matters for Textile Printing
UV DTF transfer blends ultraviolet-curing inks with a dedicated transfer film to deliver bright color and fine detail on textiles. This approach expands on established DTF printing techniques while leveraging rapid UV curing to speed production and improve color fidelity.
Because the process uses UV DTF transfer, the ink is cured instantly, producing a stable image that adheres well to fabrics and a range of hard surfaces. This combination highlights the role of UV transfer on fabric in achieving durable prints with subtle color transitions and preserved DTF transfer detail.
DTF Printing Techniques Compared to UV DTF Printing
DTF printing techniques traditionally rely on solvent- or water-based inks and physical transfer steps. UV DTF printing introduces UV-curing inks and a dedicated film that can enhance edge sharpness, color saturation, and process speed.
Understanding UV transfer on fabric and how it interacts with different substrates helps printers choose the right primers and pre-treatments. Comparing DTF printing techniques with UV DTF printing reveals differences in opacity, underbase needs, and how edge fidelity is preserved on complex images.
Optimizing Color in UV DTF Transfers
Optimizing color in UV DTF transfers starts with calibrated color workflows and accurate profiles that align ink behavior with substrate characteristics. A reliable approach is to maintain color and texture in UV DTF from design to final transfer.
Test swatches across fabrics such as cotton, polyester blends, and nylons reveal how the color gamut shifts and where an underbase may be required. This helps maintain consistency and ensures DTF transfer detail across batches.
Texture Crafting in UV DTF Transfers
Texture in UV DTF transfers is influenced by transfer film choice, substrate texture, and post-transfer handling. Proper film selection can create a tactile finish that complements the print and adds depth, supporting color and texture in UV DTF.
Surface prep and curing steps lock in texture, while layering subtle transparency can simulate depth without excessive thickness.
Maximizing Detail and Sharpness in UV DTF Transfer
Maximizing detail and sharpness relies on high-resolution printing settings, careful dot management, and precise alignment. Using higher DPI where possible helps capture fine lines and preserve DTF transfer detail.
Effective curing time and light intensity prevent color bleeding and edge softening, while font choices with robust optical weight improve legibility in small text on fabrics.
Workflow and Troubleshooting for Reliable UV DTF Transfers
Workflow for UV DTF transfers combines ink selection, transfer film choice, substrate compatibility, and reliable curing equipment, building on DTF printing techniques to ensure consistency in UV DTF printing.
Troubleshooting and best practices cover color mismatch, bleeding, adhesion, texture loss, and cracking, with steps to verify calibration, film seating, and cure parameters.
Frequently Asked Questions
What is UV DTF transfer and how does it relate to DTF printing techniques?
UV DTF transfer uses UV-curing inks printed on a transfer film, then cured with UV light to set the image before transfer to the substrate. It blends DTF printing techniques with UV curing to deliver bright color, fine detail, and strong adhesion on textiles and select hard surfaces. This approach supports fast production, high color fidelity, and the potential for textured finishes when paired with the right film and post-processing.
What factors affect color fidelity in UV DTF printing on fabric and how can I calibrate for consistency?
Color fidelity in UV DTF printing on fabric depends on solid color management and proper substrate prep. Calibrate your color workflow with printer-specific profiles, run test swatches on the actual fabric, and use a white underbase when printing on dark textiles to improve opacity. Manage the color gamut, soft-proof complex palettes, and carefully layer colors to maintain edge sharpness and accurate hues.
Which fabrics are best for UV transfer on fabric, and how does substrate choice impact adhesion and color?
Fabrics with natural give, such as cotton and cotton blends, typically perform well for UV transfer on fabric. Polyester and nylon blends may require pre-treatments or different ink formulas to maintain color accuracy and adhesion. Always test on the intended substrate to understand how texture, stretch, and fiber composition affect the final result.
How can you maximize texture and detail in UV DTF transfer without sacrificing sharpness?
To maximize texture and detail, choose transfer films designed to enhance texture or provide a tactile finish, properly prepare the substrate, and ensure thorough but controlled curing. Layer texture with tone and transparency to create depth without excessive thickness, and leverage substrate texture to achieve a natural look rather than a flat print.
What are common UV DTF transfer issues and how do you troubleshoot them?
Common issues include color mismatch, ink bleeding, weak adhesion, texture loss, and edge cracking. Troubleshoot by rechecking color calibration and profiles, ensuring the transfer film is seated correctly, adjusting cure time and intensity, and validating substrate preparation and post-cure steps to maximize bond and image fidelity.
Can you provide a practical step-by-step workflow for a UV DTF transfer project?
Design with UV DTF transfer in mind, prepare the substrate, print with color management and proper alignment marks, cure the print, apply the transfer with even pressure, perform any required post-curing and peeling, and finally inspect color accuracy, texture, and edge fidelity. Iterate with adjustments to achieve repeatable, production-ready results.
| Topic | Key Points |
|---|---|
| What UV DTF transfer is and how it works | UV DTF transfer prints UV-curing inks onto a transfer film, then cures with UV light and transfers the image to fabric or compatible plastics. It blends DTF printing with UV curing for bright, durable, high-detail results. |
| Advantages | Fast curing; production-ready results. Excellent color fidelity and saturation. Strong adhesion to a wide range of fabrics. Potential for textures and detailed imagery. |
| Color Techniques | Calibrate color workflow with reliable profiles and test swatches. Use white underbase on dark fabrics when needed. Manage color gamut and soft-proof if necessary. Layer colors strategically and cure between layers. Test on multiple fabrics. |
| Texture Techniques | Choose transfer film (glossy/matte) to achieve desired texture. Prepare surfaces properly. Cure and cool correctly to preserve texture. Layer texture with tone/transparency. Leverage substrate texture for natural feel. |
| Detail and Resolution | Print at high resolution when possible. Account for dot gain with slight toe-in or micro-smoothing. Align accurately. Optimize curing to avoid bleeding or embrittlement. Choose fonts/line weights that stay readable. |
| Materials, Equipment, and Workflow | Inks and primers designed for UV DTF. Suitable transfer films. Substrates (fabrics, blends, plastics). Reliable UV printer and curing setup. Post-processing steps as needed. |
| Step-by-Step Workflow | 1) Design with UV DTF in mind. 2) Prepare substrate. 3) Print with color management. 4) Cure the print. 5) Apply the transfer. 6) Post-cure and peel. 7) Inspect and refine. |
| Troubleshooting and Best Practices | Color mismatch: recalibrate and re-profile. Bleeding/feathering: adjust cure time and ensure film seating. Adhesion: improve surface prep; consider post-press. Texture loss: try different films or thickness; verify cure. Cracking/stiffness: reduce layers or adjust cure. |
| Real-World Tips | Maintain a stable environment. Run routine quality checks. Document settings and keep materials organized. Iterate with small batch tests before scaling up. |
Summary
Conclusion