
Advanced 3D embroidery techniques are redefining what’s possible on fabric, adding height, depth, and tactile interest that captivate viewers from the very first glance while expanding what designers can express across fashion, accessories, and home textiles through padding, layered stitching, and precise digitizing. Successful implementation begins with a strategic plan for depth, selecting fabrics that respond to padding, and mapping elevation with software so the final piece reads clearly at distance and rewards close inspection. Designers test combinations of foam density, backing stability, thread weights, and underlays on swatches, adjusting stitch order to balance lift with wearability, ensuring the raised elements maintain shape under movement and laundering. A core technique often enabling dramatic lift is 3D puff embroidery, where a foam or soft padding sits beneath the stitches to push the surface outward, and the stitches are built over it to create a rounded, light-catching silhouette; achieving even height requires careful calibration of foam thickness, consistent hoop tension, and a thoughtful stitch density that avoids puckering or foam migration. To support that lift over the garment’s life, practitioners select stabilizers that resist compression, pair stable backings with appropriate foam, and tune thread weight and tension to preserve crisp edges; testing on similar fabrics before production helps prevent distortion during wear and wash cycles, while choosing the right needles and machine settings reduces snagging and curl. In practice, the best results come from a disciplined cycle of planning, prototyping, and refinement, ensuring that each raised element delivers consistent texture, color depth, and tactile impact across lighting conditions; the outcome should feel like a deliberate design choice rather than a stitched afterthought, offering a premium hand and durable embellishment that elevates the overall perception of the fabric and brand.
From a terminology perspective, these techniques fall under three-dimensional embellishment, dimensional stitching, and raised-texture embroidery, where designers talk about height, relief, and tactile sculpture rather than ordinary surface ornament. Practically, this means thinking in terms of padding-based construction, layered motifs, and contour-driven design, using digitizing tools to map height, order stitches, and control where elevation appears on the fabric. In practical terms, this mindset makes the approach approachable for garments, bags, and home décor, while maintaining fabric handle and washability. The LSI-ready mindset connects these terms to related production concerns, such as stability, thread choice, and precise hooping, helping readers discover related topics like padding systems, layered appliqué, and textured finishes.
1) Understanding Advanced 3D embroidery techniques: Depth, Texture, and Real-World Impact
Advanced 3D embroidery techniques redefine what fabric can communicate by adding height and shadow that capture light and movement from any angle. This depth helps logos and motifs read clearly from a distance while revealing new details up close, elevating the perceived quality of apparel and home décor items. When planning, designers often balance padding, stitch order, and layer interactions to ensure the fabric remains wearable and durable after wear and washing.
Strong execution comes from combining core methods like 3D puff embroidery, layered appliqué, and dense satin or fill stitches that are broken into multiple layers. Understanding how these techniques interact with stabilizers for 3D embroidery and the texture created by thread choices is essential for achieving professional finishes that translate well from screen to stitch. By prioritizing depth planning and material control, you set up for reliable, salon-worthy results across jackets, caps, or pillows.
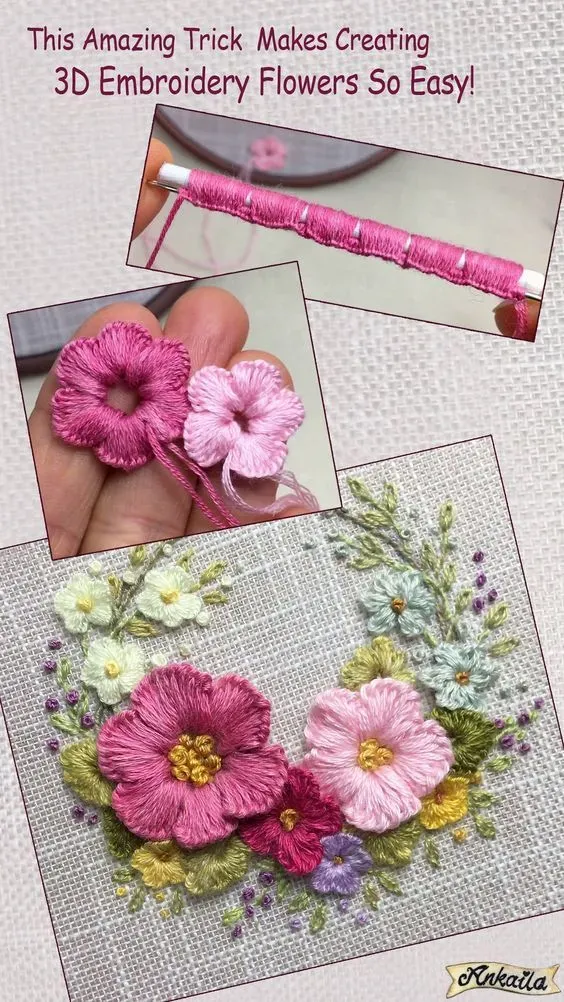
2) Mastering 3D Puff Embroidery: From Foam Padding to Practiced Precision
3D puff embroidery is the quintessential 3D effect, built from a foam or soft padding placed beneath the stitch area to push the fabric outward. The result is a raised motif that catches light and adds visible volume. Key decisions include selecting foam thickness that matches the design density, ensuring even pressure in the hoop, and choosing stabilizers that resist compression so height is maintained through washing.
To perfect 3D puff embroidery, focus on precise foam placement, stitch density, and consistent tension. Practice with simple shapes before tackling logos, test multiple density settings, and verify that the padding remains evenly distributed under the stitches. This discipline helps you avoid warping and yields a durable, dimensional finish that reads as high-end machine embroidery effects on diverse fabrics.
3) Layered Appliqué and Elevation: Building Depth with Multi-Layer Textures
Layered appliqué uses multiple fabric layers to create natural shadows and contour. The bottom layer provides a stable foundation, the middle layer adds color depth or tonal variation, and the top edge is finished with a dense stitch to lock everything in place. The resulting elevation comes from how these overlapping layers interact when the garment moves, catching light differently at every angle and enhancing perceived depth.
This technique benefits from thoughtful thread choices and texture planning. Using varied thread textures in embroidery—such as combining matte and metallic finishes or subtle variegation—enhances the tactile realism of the design. Planning with 3D embroidery techniques in mind helps ensure the layered elements stay secure and readable, even after repeated use and laundering.
4) Digitizing for 3D Depth: Planning Height, Layering, and Stitch Order
Digitizing is the bridge between concept and fabric, and for 3D depth it requires intentional height data and layer ordering. Start by outlining the base shape, then map where padding will be inserted and how layers will stack. This layer-based design approach lets you adjust height independently for different elements while keeping the backbone of the design stable.
During stitching, prioritize the order so that exposed 3D elements are stitched last, ensuring padding stays secure and the surface reads cleanly. Test digitized files on similar fabrics to observe how height translates under real-world lighting and movement. This careful preview helps you anticipate results and refine for coherent machine embroidery effects that match your concept.
5) Stabilizers and Backings for 3D Effects: Supporting Height and Durability
Stabilizer selection directly influences final appearance and durability. For puff designs, light to mid-weight stabilizers with breathable backing help prevent curling while preserving foam height. For layered appliqué or dense areas, cut-away stabilizers provide long-term stability and launderability, while water-soluble options are useful when the support must vanish after embroidery on delicate fabrics.
Always test stabilizer combinations on your chosen fabric to avoid warping and stiff edges. The right pairing—stabilizer type, backing, and foam—keeps the raised elements from sagging and ensures consistent results across production runs. This groundwork is essential for professional, repeatable finishes on garments and accessories.
6) Color, Texture, and Finish: Enhancing Visual Impact with Thread Textures
Color and texture work in tandem to amplify depth. Contrasts between raised elements and their backgrounds help the 3D effect stand out, while thread textures in embroidery add tactile nuance that rewards close inspection. Consider specialty threads and strategic variegation to introduce subtle shifts in hue and sheen without increasing stitch count.
Finishing steps matter as much as the stitching itself. Edge finishing, trimming excess backing, and securing borders around raised motifs sharpen silhouettes and improve wear resistance. When you pair thoughtful color choices with textured threads, you create rich machine embroidery effects that elevate the overall design narrative and reinforce the piece’s premium feel.
Frequently Asked Questions
What are the essential considerations when starting with 3D puff embroidery as part of Advanced 3D embroidery techniques?
For 3D puff embroidery, place foam padding under the raised stitches and choose the foam thickness that suits the design. Use stabilizers for 3D embroidery that resist compression, ensure even hoop pressure, test stitch density, and consider border stitching to sharpen the silhouette.
How do stabilizers for 3D embroidery influence height retention and fabric stability?
Stabilizers for 3D embroidery—such as tear-away or cut-away with a foam underlay—support height and prevent distortion. Match the stabilizer to the fabric and design density, and validate the setup with test runs.
How can digitizing for 3D depth translate into machine embroidery effects that look professional?
Digitizing for 3D depth should map padding placement and layers, using layer-based designs to control height. Plan stitch order so exposed 3D elements stitch last, and test on similar fabrics to confirm how lighting and wear affect the machine embroidery effects.
What role do thread textures in embroidery play in achieving convincing 3D effects?
Thread textures in embroidery add visual depth and tactile interest. Use high-sheen polyesters or rayons, along with variegated or metallic threads for highlights, while balancing texture with stitch density to avoid flattening the 3D look.
What are best practices for achieving consistent results with Advanced 3D embroidery techniques across different fabrics?
Choose stabilizers and foam appropriate for each fabric (denim, twill, knits), adjust tension, and run trials to fine-tune height. Ensure even foam placement and finish with careful edge work to maintain consistent depth.
What finishing and troubleshooting tips help preserve the depth of Advanced 3D embroidery techniques on garments?
Trim the foam neatly, apply edge finishing around raised motifs, and document foam thickness, stabilizer type, and stitch order to reproduce results. Regular testing helps maintain durable, salon-worthy 3D embroidery.
| Aspect | Key Points |
|---|---|
| Introduction | 3D embroidery adds height, volume, and texture to fabric; aims for depth, tactile interest, and professional finishes; plan, control materials, and test setup. |
| Main techniques | 3D puff embroidery with padding; layered appliqué with 3D elevation; dense satin or stacked fill; finishing touches to retain height and silhouette. |
| Tools & materials | Stabilizers (tear-away/cut-away), foam/padding, threads (high-sheen polyesters/rayon; variegated/metallics), needles and machine tension, hoop/frame, design software that supports layers and height. |
| Digitizing for 3D depth | Plan layers, padding placement; use layer-based designs; map height; order stitches so exposed 3D elements go last; test on similar fabric. |
| Stabilizers & backings | Stabilizer choice affects height and durability; puff uses light-to-mid weight with foam; layered appliqué uses cut-away; water-soluble stabilizers vanish after embroidery; test combos. |
| Fabric choices & finishing | Heavier fabrics hold features; knits require stable backing; two-layer approach for lighter fabrics; trim foam; edge finishing improves wear resistance. |
| Color & texture | Color contrast enhances depth; texture via thread choices; use specialty or variegated threads for complexity; elevate design narrative. |
| Troubleshooting | Puckering, uneven height, foam visibility, color bleeding; adjust stabilizer, density, foam placement; test on sample fabrics. |
| Real-world applications | Branding on jackets/caps, home décor pillows, bags, sneakers; results convey quality and durability; suited for studios and production houses. |
| Final tips | Plan for depth from the start; run trials; maintain a reference library; invest in quality materials; document processes for reproducibility. |
Summary
Advanced 3D embroidery techniques offer a powerful toolkit for elevating fabric embellishments across fashion, branding, and home décor. This descriptive overview highlights how depth, texture, and layered construction come together through 3D puff embroidery, layered appliqué, and careful stitch planning. By selecting appropriate materials, mastering digitizing for height data, and testing on representative fabrics, you can achieve durable, salon-quality results. The process emphasizes planning, iteration, and attention to stabilizers and finishing touches to maintain height and silhouette over time. Mastery of Advanced 3D embroidery techniques expands creative possibilities and elevates the perceived value of embroidered products.