
3D embroidered on fabric opens a new realm of texture for textiles, apparel, and home decor, inviting touch as raised elements catch the light. This sculptural stitching goes beyond flat embroidery to create dimensional designs that pop from the surface. To achieve durable depth, you’ll balance fabrics for 3D embroidery on fabric with the right stabilizers for 3D embroidery, choosing stable cloths and backing to support padding. If you’re planning projects that withstand wear, consider 3D puff embroidery on fabric and select the best stabilizers for embroidery projects to keep layers secure. Understanding how fabrics for 3D embroidery pair with stabilizers for 3D embroidery gives you the confidence to create bold, vibrant pieces that hold up through washing.
Viewed from another angle, this craft is often described as three-dimensional embroidery on textiles, dimensional stitching, or fabric relief that creates tangible depth. Craftspeople speak of padded motifs, raised surfaces, and plush layering to convey the same sculptural effect as 3D embroidered on fabric. Using LSI-friendly terms such as padding, foam backing, and stable fabrics helps search engines associate related topics like stabilizers for 3D texture and durable finishes. No matter the vocabulary, the core idea remains the same: a controlled build of structure beneath the stitches to maintain form through wear and laundering.
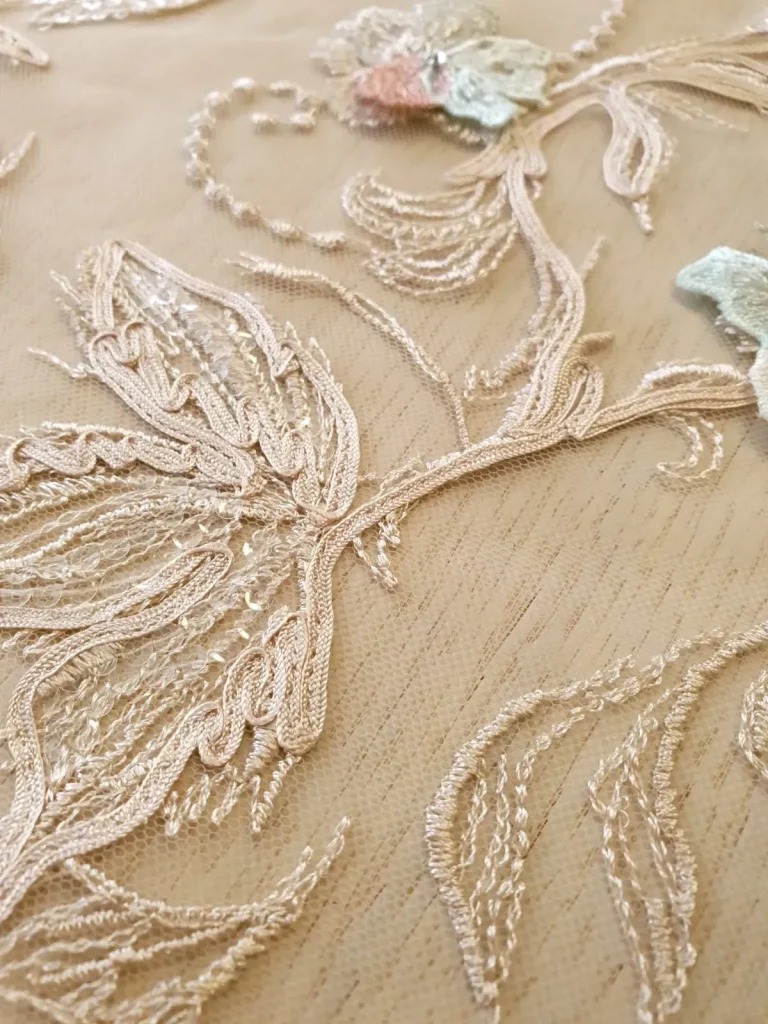
3D embroidered on fabric: Techniques, foundations, and how it differs from flat embroidery
3D embroidery on fabric adds height, volume, and tactile interest by building up padding, foam, or layered textiles beneath the stitched surface. This approach goes beyond traditional flat embroidery by creating sculptural designs that catch the light and invite touch. To achieve this, a careful combination of base fabric, padding materials, and appropriate stabilizers is essential so the raised elements hold their form through wear and washing.
Compared with standard embroidery, 3D techniques require planning for depth from the outset. The fabric must provide stability to prevent puckering, while the padding layers establish the raised silhouette. Designers typically test material combinations on scraps, adjust stitch density, and sequence the layering of foam, threads, and backing to preserve the dimensional look. In short, successful 3D embroidery on fabric blends material selection with a thoughtful stabilization strategy to keep the sculpture recognizable after years of use.
Fabrics for 3D embroidery: Best bases for stable, dimensional designs
Choosing the right fabric is foundational to a durable 3D embroidery project. Stable, tightly woven textiles resist distortion and support the weight of padding and raised stitches. Common options include cotton twill, canvas, denim, felt, and tightly woven linen. Felt, in particular, is forgiving for stacking layers and doesn’t fray, making it an excellent canvas for 3D work, especially on smaller motifs.
The end use of the piece should guide fabric choice as well. Garments require fabrics that withstand multiple wash cycles without losing shape, while home décor items may prioritize rigidity and durability. Weighing weight, fiber content, and weave helps determine how well a fabric will hold the 3D elements, and testing different fabrics with padding and stabilizers ensures you select fabrics for 3D embroidery that stay dimensional over time.
Stabilizers for 3D embroidery: Types, roles, and how to choose
Stabilizers provide the backbone that keeps your 3D design dimensional. Common types include tear-away stabilizers for easy removal after stitching, cut-away stabilizers for robust support, and water-soluble or dissolvable stabilizers that vanish after finishing. Many projects benefit from a layered approach, such as a stable cut-away backing on the underside to secure stitches and a floating, dissolvable stabilizer on top to support dense or looped stitching before removing it.
Choosing stabilizers for 3D embroidery also depends on the machine, needle size, and thread types you use. Heavier threads or metallics can pull on the fabric, so pairing them with a stabilizer that provides extra stability helps maintain stitch integrity. Always test material combinations on a scrap piece to understand how the fabric, padding, and backing interact, which is a core step in selecting the best stabilizers for embroidery projects.
3D puff embroidery on fabric: Padding, foam, and layered depth
3D puff embroidery on fabric creates the distinct raised surface that gives a design its plush, tactile character. Padding materials and foam forms are central to this effect, providing something for the stitches to rise above. The key is to choose padding compatible with your fabric and stitch density; too much padding on a delicate base can cause distortion, while too little may fail to achieve the desired depth.
To keep the dimensional look intact, position padding carefully and trim foam slightly smaller than the hoop area to prevent edge peeking. Build the design in layers, stitching sections, adding foam, and re-stitching as needed to add depth incrementally. Controlling the order of operations and padding thickness helps ensure the 3D effect remains pronounced after finishing and laundering.
Layering strategies for durable 3D embroidery: construction, stitching order, and finishing
A practical approach to 3D embroidery is to plan construction in layers. Start with a stable base fabric and apply the appropriate stabilizers, then add padding for the 3D effect, and finally stitch the design with attention to stitch density and lay-flat finishing. A layered workflow helps prevent distortion and keeps raised elements crisp as the piece wears.
Finishing touches matter just as much as the build. Maintain dimension by allowing padding to settle and verifying heat settings when using heat-set stabilizers or heat-press appliques. If you’re using multiple materials, test combinations on scraps to refine your layering order. With thoughtful layering and careful finishing, your 3D embroidery on fabric can stay bold and durable across seasons.
Care, maintenance, and troubleshooting for 3D embroidered projects
Care and maintenance are essential to preserving the depth and texture of 3D embroidery. Follow garment care instructions, consider turning items inside out before washing, and air-dry to protect padding and backing. If heat-setting stabilizers are involved, verify heat settings to avoid melting or warping the surface. Gentle care helps the dimensional elements stay vibrant over time.
Troubleshooting common issues—puckering, fabric movement, or flattening of the raised elements—often comes back to stabilization and layering choices. Ensure the hoop is properly tensioned, re-evaluate stabilizer choice, and test stitch density if puckering appears. When flutter or movement occurs during stitching, consider temporary adhesive or basting stitches to hold fabric in place. By refining fabric choices, padding, and stabilizers, you can keep 3D embroidered projects looking fresh after multiple washes.
Frequently Asked Questions
What is 3D embroidered on fabric and how does it differ from traditional embroidery?
3D embroidered on fabric creates raised, dimensional designs using padding, foam, or multiple layers beneath the surface. It relies on stable backing and padding to hold form through washing and wear, unlike flat embroidery.
Which fabrics for 3D embroidery work best for 3D embroidered on fabric designs?
Stable, tightly woven fabrics are best for 3D embroidered on fabric designs, such as cotton twill, canvas, denim, felt, and tightly woven linen. These fabrics resist stretching and support padding and raised stitches for durable, dimensional results.
What stabilizers for 3D embroidery should I use to support padding in 3D puff embroidery on fabric?
Use a combination approach: a cut-away backing under the design for strength, plus a water-soluble (or wash-away) stabilizer on top to support dense stitching. For lighter projects, tear-away can work, but choose based on wear and washing.
How does 3D puff embroidery on fabric differ from flat embroidery, and what stabilizers for 3D embroidery help?
3D puff embroidery on fabric adds height using padding or foam, creating a plush look unlike flat stitches. Use a stabilizer mix that provides backing (cut-away) and a top stabilizer that can dissolve or remain light to prevent stiffness, while selecting appropriate fabrics for 3D embroidery.
What are the best stabilizers for embroidery projects when creating 3D embroidered on fabric patches?
Typically, a robust cut-away backing with a dissolvable top stabilizer works well for patches that see wear. This combo keeps stitches secure while allowing the raised elements to stay dimensional.
What practical tips help avoid puckering when doing 3D embroidered on fabric using padding and foam?
Test on scrap to tune fabric, padding, and stabilizers. Hoop tightly enough to prevent movement without over-stretching; trim foam to prevent edges from peeking; and follow care instructions to preserve the 3D effect through laundering.
| Aspect | Key Points | Notes |
|---|---|---|
| What is 3D embroidery on fabric? | Creates raised, sculptural designs using padding, foam, or layered textiles; adds dimensional texture and tactile interest; differs from flat embroidery by building a structure under the stitches. | This is the foundation idea from the introduction. |
| Differences from traditional flat embroidery | Emphasizes volume and dimension; focuses on maintaining form after use and washing; relies on layering and padding to achieve depth. | Planned padding and structure are key to the 3D effect. |
| Fabrics for 3D embroidery | Stable, tightly woven, or dense fabrics resist stretching and distortion. Examples: cotton twill, canvas, denim, felt, tightly woven linen. | Felt is non-fraying and forgiving; heavier fabrics support larger motifs. |
| Fabric end use considerations | Wearables must survive multiple wash cycles; home decor emphasizes rigidity and durability. | End-use guides fabric choice and stabilizer needs. |
| Stabilizers | Types include tear-away, cut-away, and water-soluble/dissolvable. Often used in combination for stability throughout stitching. | Top dissolvable stabilizers can support dense stitching while maintaining clean edges. |
| Stabilizer strategy | Use a combination: stable backing under the fabric and a floating/dissolvable stabilizer on top for layered 3D work. | Supportive backing plus removable top stabilizers preserve depth. |
| Padding materials | Foam or soft padding creates the 3D lift; ensure padding is compatible with fabric and stitch density; trim foam slightly smaller than hoop to prevent edge peeking. | Padding choices affect distortion and silhouette. |
| Layering approach | Plan in layers: base fabric + stabilizer, add padding, then stitch. For multi-layer designs, stitch sections, add foam, and re-stitch to build depth. | Layer order controls final 3D silhouette. |
| Thread and machine considerations | Heavier weight threads or multiple strands add texture; stable base and compatible stabilizers are crucial for thread types like metallic or rayon. Always test on scrap. | Test material combinations to ensure stitch integrity. |
| Troubleshooting and care | Watch for fabric puckering; adjust stabilizer and stitch density; ensure hoop is secure but not over-tight; use spray adhesive or basting if needed; allow foam to settle. | Pre-stitch tests help prevent issues. |
| Care and maintenance | Follow gentle washing and air drying; be mindful of heat-settings with stabilizers; turning inside-out can help protect the surface. | Proper care preserves the 3D depth and texture. |
| Overall outcomes | Best results come from blending fabric selection, stabilizer strategy, padding/foam, threads, and layering to create durable, vibrant 3D embroidery on fabric. | Practice and testing yield professional, lasting results. |