
UV DTF transfer on dark fabrics offers vibrant, durable prints on black, navy, and other deep-toned garments by using an opaque white underbase to build true color. To maximize color accuracy, UV DTF transfer on dark fabrics color tips help you manage opacity, ink density, and curing, ensuring designs read clearly on a dark background. Bleed prevention UV DTF is central to clean edges, so schedule proper underbase curing and control heat to keep lines sharp. Dark fabric printing tips UV DTF emphasize layered color builds and overlays to preserve brightness without washing out details. For reliable results, focus on color accuracy on dark fabrics during setup, while using UV DTF troubleshooting for dark fabrics to address common transfer challenges.
In alternative terms, this approach resembles a UV-curable film transfer tailored for dark textiles, where an opaque base and adhesive layer carry bold designs. From an LSI perspective, focus on related concepts such as substrate color management, white underbase opacity, ink layering, and curing consistency to preserve color integrity. Other relevant notes include terms like opaque backing, color layering, adhesion control, and post-press finishing that all support sharp edges and minimal bleed. By thinking in these related terms, you can plan workflows that align with color accuracy, durability, and efficient production across a range of dark fabric substrates.
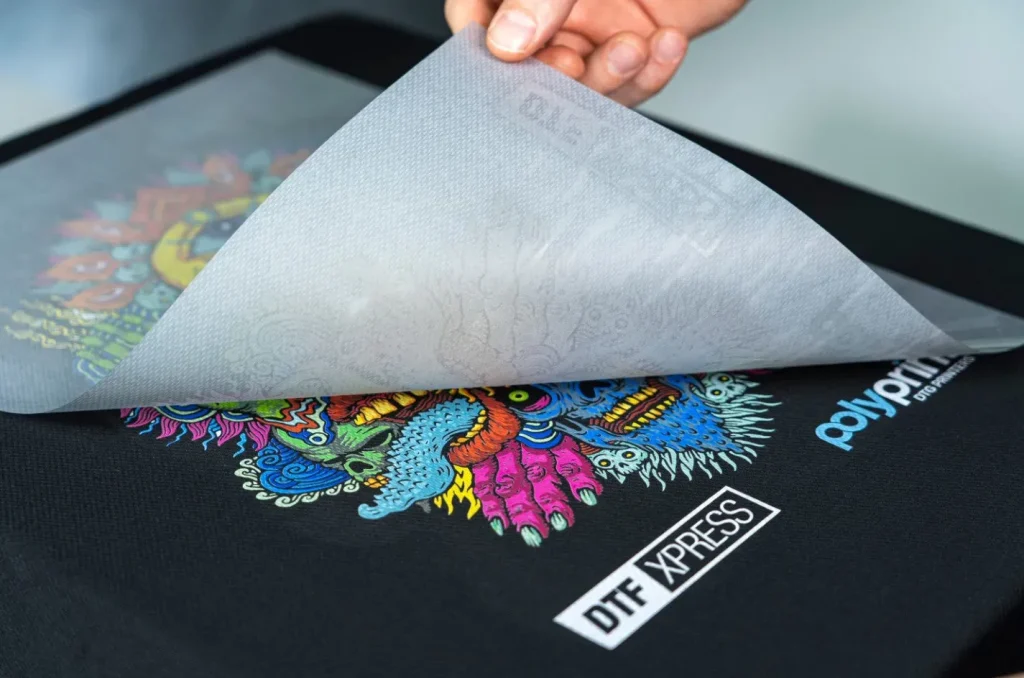
UV DTF transfer on dark fabrics: essential underbase and color layering strategy
On dark fabrics, a solid white underbase is not optional—it is essential for achieving vibrant, readable colors. The underbase provides the opacity necessary to prevent the fabric’s base color from distorting your design, ensuring that bright hues stay true after transfer. When planning your UV DTF workflow, design with a crisp white layer in mind and verify that your underbase print is clean, even, and fully opaque.
Beyond the underbase, build your color with multiple, well-separated ink layers. Layering helps preserve edge sharpness and detail, especially around fine lines and small text. Utilizing dye or pigment offsets, gradients, and halftone effects on dark fabrics can benefit from higher mid-tone opacity and a lighter edge treatment to maintain color accuracy and prevent bleed or muddiness.
Color accuracy on dark fabrics: calibrations, profiles, and test runs for UV DTF
Color accuracy starts with proper calibration. Calibrate your monitor to an ICC profile that matches your printer and ink family, then run test prints on similar dark fabrics before committing to a larger batch. Maintain a color library of reference swatches on dark textiles to compare RGB-to-spot color conversions at a glance, and use device link profiles and soft proofing to keep fidelity when colors shift during curing.
Develop a consistent color workflow by building a library of verified color recipes and separating colors strategically. Keep notes on how each fabric may shift after UV curing, and adjust the color recipe accordingly. This approach aligns with UV DTF transfer on dark fabrics color tips and helps maintain color accuracy across batches.
Bleed prevention techniques for UV DTF on dark fabrics
Bleed can ruin a design on dark fabrics, especially around fine lines and small details. Implement bleed prevention UV DTF by ensuring a robust white underbase that provides a single opaque barrier between fabric and color layers, and confirm that the underbase is fully cured before applying the color layers. If you notice white halos or uneven coverage, revisit underbase printing parameters and consider increasing opacity slightly.
Control the curing and pressing environment to minimize bleed. Follow manufacturer recommendations for curing time and light exposure, and allow a brief post-cure hold if needed to evaporate solvents. Pre-press the fabric to remove moisture and flatten fibers, then apply consistent heat, time, and pressure during transfer to prevent ink from spreading beyond intended boundaries.
Ink opacity and saturation management for dark fabric printing tips UV DTF
Opacity and saturation are critical when printing on dark textiles. Review opacity charts for your UV inks and perform controlled swatch tests to confirm how well each color hides the fabric color. If a color looks washed out in a test print, adjust underbase density or switch to a higher-opacity pigment to preserve vibrancy after curing.
Use layered color management to preserve brightness in shadows and highlights. Higher-opacity mid-tones with lighter edge treatments help retain detail after transfer. Selecting inks with predictable opacity on dark fabrics and testing them on the exact substrate will improve color stability and overall print quality.
Troubleshooting common UV DTF issues on dark fabrics
If colors appear faded after transfer, review underbase opacity, color density, and cure time. Common fixes include increasing the underbase opacity, boosting color density in test prints, and verifying curing parameters to ensure pigments reach full cure without overexposure.
Bleed, misregistration, or white shows through in non-white areas indicate alignment or ink behavior issues. Corrective steps include more precise color separation, tighter design outlines, improved registration checks, and recalibrating color workflows for fabric-specific ICC profiles. For persistent color shifts after curing, consult UV DTF troubleshooting for dark fabrics to adjust recipes and printing parameters accordingly.
Step-by-step UV DTF workflow for dark fabrics: a repeatable process
Begin with fabric preparation and design setup: pick a compatible dark fabric, verify its blend, and prepare a file with a crisp white underbase followed by color layers. Use high-contrast outlines and careful color separations to protect edge integrity around curves and fine details.
Print the white underbase first, ensuring a solid, opaque layer, then cure as required. Next, print the color layers with appropriate density, avoiding excessive saturation in small text. Apply the adhesive film or powder, cure, pre-press the garment to remove moisture, and finally transfer, press, and cool gradually to minimize distortion. Finish with a final cure and quality check to confirm color consistency, edge sharpness, and absence of bleed.
Frequently Asked Questions
What is UV DTF transfer on dark fabrics and why is a white underbase essential?
UV DTF transfer on dark fabrics relies on a white underbase to provide opacity against dark backgrounds, ensuring colors read true. A robust underbase reduces edge bleed and color distortion, so verify even coverage and full cure before adding color layers. For bleed prevention UV DTF, tune curing and adhesion parameters per substrate to maintain crisp edges.
How can I achieve color accuracy UV DTF transfer on dark fabrics?
To achieve color accuracy UV DTF on dark fabrics, start with calibration of your monitor to an ICC profile that matches your printer and inks. Run test prints on similar dark fabrics and build a reference swatch library to compare RGB-to-spot conversions. Use device link profiles and soft proofing to maintain fidelity, and adjust underbase density and layer opacity as needed.
What are the best bleed prevention UV DTF techniques for dark fabrics?
Bleed prevention for UV DTF on dark fabrics centers on: 1) optimizing the white underbase and adhesion, 2) controlling curing conditions to prevent ink spread, and 3) thorough pre-press and even press parameters. Maintain consistent temperature, time, and pressure, avoid over-saturation at edges, and ensure complete cure of all layers.
What troubleshooting steps exist for common issues in UV DTF troubleshooting for dark fabrics?
Common issues include faded colors, bleed along edges, white underbase showing through, and color shift after curing. Troubleshooting steps: verify underbase opacity and cure time, ensure accurate alignment and color separations, calibrate the color workflow with fabric-specific ICC profiles, and perform targeted test prints on the same fabric to guide adjustments.
How should I layer colors for dark fabric printing tips UV DTF to maintain edge sharpness?
Design with multiple ink layers: apply a crisp white underbase first, then color layers with attention to midtone opacity and lighter edge treatment. Use well-separated color layers and build color to account for the white base, preserving edge clarity and reducing feathering on dark fabrics. Follow dark fabric printing tips UV DTF to sustain edge sharpness.
What steps help maintain long-term color consistency on UV DTF on dark fabrics color tips?
Maintain long-term color consistency by storing inks properly, regularly calibrating monitors and printers to a fabric-specific ICC profile, and building a library of tested fabric swatches. Document processing settings for each fabric type, run periodic test prints, and compare against reference colors to detect and correct shifts early.
| Topic | Key Points |
|---|---|
| White Underbase |
|
| Color Workflow Calibration |
|
| Layered Color Construction |
|
| Ink Opacity & Saturation |
|
| Color Management for Dark Fabrics |
|
| Bleed Prevention Techniques |
|
| Troubleshooting Common Issues |
|
| Practical Step-by-Step UV DTF Workflow for Dark Fabrics |
|
| Long-Term Color Consistency |
|
Summary
UV DTF transfer on dark fabrics opens bold, durable design possibilities for dark garments. This conclusion emphasizes color accuracy, bleed prevention, and a disciplined workflow: solid white underbase, layered color separations, precise curing and pressing, and ongoing color management. With careful testing on the exact fabric, maintaining a reference library, and documenting process settings, you can achieve consistent, professional UV DTF results on dark fabrics.