
3D embroidery machine settings unlock the height, texture, and dimensional pop that make designs leap from fabric, transforming flat patterns into tactile art that catches the eye, invites closer study, and elevates everyday garments into gallery-worthy statements across different textures and weights. Mastery comes from balancing stitch density, foam placement, and the interaction of stabilizers for 3D embroidery, ensuring edges stay crisp and surfaces remain smooth during wear, washing, and repeated use; these elements collectively govern how foam interacts with fabric under pressure, affecting rebound, edge definition, and overall stability. To achieve crisp stitching techniques, tune tension adjustment for embroidery so raised areas hold their shape without puckering, while thoughtful underlay supports prevent fabric creep and stitch misalignment across complex curves across varying stitch counts and thread brands. Choosing the right foam stabilization and stabilizer combination—what we call 3D foam stabilization and the strategies for hoop tension and fabric types—prevents distortion during long runs, maintains uniform heights, and supports durable finishes in real-world wear, in a variety of garment applications and home decor pieces. This introductory guide translates theory into practice, offering a clear workflow, practical test swatches, and notes you can reuse project to project for consistently impressive results across a range of fabrics and designs; careful documentation of results helps teams scale up production while preserving the same crisp quality.
Beyond the exact phrase 3D embroidery machine settings, designers describe this approach as dimensional embroidery, foam-backed texture, or raised-stitch work that adds depth. LSI-friendly terms such as three-dimensional stitching, textured applique, and height-driven motifs reflect the same technique, emphasizing the role of foam, stabilizers, and careful tension to preserve shape. In practice, teams think in terms of height management, edge definition, and wash-fast stability, using the same tools but naming the steps differently. If you search for foam stabilization, hoop tension, and fabric compatibility alongside 3D effects, you’ll find overlapping guidance that reinforces how to achieve crisp, durable results.
Mastering 3D embroidery machine settings for crisp results
When you approach 3D embroidery, the most critical gains come from dialing in 3D embroidery machine settings that balance density, height, and tension. This is where crisp stitching techniques begin to take shape, as subtle shifts in density create raised elements that pop without looking bulky. By focusing on precise tension balance between the top thread and bobbin, you can keep the raised areas well-defined while preventing the base fabric from distorting under load.
To translate theory into practice, start with a prototype and test swatches that mirror your target fabric. This is your sandbox for experimenting with tension adjustment for embroidery, stitch density, and foam interaction. Document the outcomes so you can reproduce successful configurations on future projects, ensuring that the 3D effects stay consistent from sample to production.
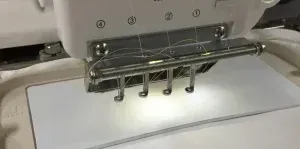
The role of stabilizers and foam in achieving true 3D puff
Stabilizers form the backbone of clean, professional 3D embroidery. Choosing the right stabilizers for 3D embroidery—tear-away for lightweight fabrics, cut-away for durable designs, or temporary water-soluble options for intricate motifs—helps prevent fabric creep and edge wobble. When combined with a foam backing, stabilizers work together to maintain crisp outlines and uniform height across the raised elements.
Foam backing is essential for that unmistakable puff, but its thickness and placement must be carefully matched to the design. 3D foam stabilization requires considering how the foam compresses under stitch pressure and how it interacts with underlay and top stitches. Properly positioned foam keeps the height visually even while avoiding crowding that can distort stitch lines or create hard edges.
Tension and stitch density: balancing top and bobbin for depth
A balanced tension strategy is the heartbeat of 3D embroidery. The tension adjustment for embroidery should aim for a slightly tighter top thread to help the raised sections retain their definition, while the bobbin tension must remain compatible to prevent loose underlays or looping. This balance directly influences stitch density and height, shaping how the design pops from the fabric.
Experiment with progressive densities: keep edge areas slightly denser to resist flattening, and ease density toward the center to avoid a rigid silhouette. This careful tuning also affects how underlay stitches support the foam and base fabric, contributing to a more durable and visually crisp result even after multiple washes.
Hooping strategies for consistent 3D embroidery on different fabrics
Hooping is the stage where stable geometry is born. A correctly hooped fabric lies flat, with the stabilizer taut to minimize fabric shifts that would translate into jagged edges or uneven height. The dialogue between hoop tension and fabric types determines how well your 3D elements hold their shape during stitching.
When working with diverse fabrics, adjust hoop tension and stabilizer choice to accommodate stretch, weight, and texture. Place 3D elements away from the hoop edge when possible, or use stabilization strategies designed for edge stability. This approach helps preserve crisp outlines and smooth transitions between raised regions and the base fabric.
Layered design workflow for crisp 3D effects
A deliberate, layered workflow translates design intent into reliable, repeatable results. Start with base stitches and underlay to establish groundwork, then add foam for height, and finish with top stitches to lock in definition. This layered approach aligns with crisp stitching techniques, ensuring each layer contributes to the final 3D look without overpowering others.
Software planning and simulation are invaluable in predicting how height, density, and foam interaction will render on fabric. Build the 3D effect through multiple layers and use previews to anticipate stitch transitions. Thoughtful color choices and thread management further enhance the crisp edges and dimensional shading that define striking 3D embroidery.
Troubleshooting and maintenance to preserve 3D texture
Even with careful settings, issues can arise. Puffy or loose areas around raised elements often point to inconsistent foam compression or insufficient underlay support. Address these with targeted adjustments to top thread density and re-evaluated underlay, drawing on the stabilizers for 3D embroidery to reinforce fabric stability.
Ongoing maintenance is essential to preserve the 3D texture over time. Regularly recalibrate based on fabric type, stabilizer, and thread changes, and keep a notebook of successful configurations. Laundering tests are critical, as some foams compress or shift with washing; use these results to refine 3D foam stabilization and tension strategies for durable, professional results.
Frequently Asked Questions
What are the core 3D embroidery machine settings to tune for crisp stitching techniques?
The core 3D embroidery machine settings include balancing top thread and bobbin tension, adjusting stitch density and height, selecting appropriate stitch types and underlay, controlling foam thickness and compression, and choosing the right needle size. For crisp stitching techniques, start with a baseline, then test swatches to set a slightly tighter top tension while monitoring bobbin tension to prevent bulky underlay or loops. Always validate on fabric scraps before running a full garment.
How do stabilizers for 3D embroidery influence hoop tension and fabric types?
Stabilizers for 3D embroidery form the foundation that prevents stretching and shifting. Choose tear-away, cut-away, or water-soluble stabilizers (and foam backing where needed) based on fabric type and design complexity. Ensure the hoop holds the fabric taut without crushing fibers, and select a stabilizer that works with your hoop tension and fabric type to maintain clean 3D edges.
Why is tension adjustment for embroidery crucial when using foam stabilization?
Tension adjustment for embroidery is crucial because the top thread tension affects how defined the 3D heights are, while bobbin tension controls bulk underneath. When using foam stabilization, test and set a slightly tighter top tension and ensure the foam sits evenly without compressing excessively. Always validate on scraps before final stitching.
How does 3D foam stabilization affect crisp stitching and stitch density?
3D foam stabilization sets the height and puff of the design, so foam thickness and how it compresses during stitching directly influence crispness and density. If the foam is too thick or over-compressed, lines distort; if too thin, the 3D effect is weak. Balance foam placement with underlay and adjust top tension and density accordingly, testing on scraps first.
What are best practices for hoop tension and fabric types to avoid puckering in 3D embroidery?
Hoop tension should hold the fabric taut without crushing fibers. Different fabric types (lightweight cotton, knits, specialty fabrics) react differently, so adjust top tension and stabilizer choice accordingly. Hoop away from edges when possible, and use stabilizers to stabilize edges and avoid puckering in 3D elements.
What is a practical workflow for achieving consistent crisp results with 3D embroidery machine settings?
A practical workflow starts with a prototype to test tension, density, and foam interaction. Calibrate tension and density on fabric scraps with similar weight and stabilizers, validate foam placement, and check edge control. Run laundering tests and keep a notebook of configurations to reproduce successful results.
| Aspect | Key Points | Practical Tips |
|---|---|---|
| Goal of 3D embroidery | Adds height and texture; requires control of density, height, foam, stabilizer interactions | Test prototypes; ensure raised areas are defined; monitor fabric stretch; avoid puckering. |
| Core machine settings | Tension balance; Density & height; Stitch types & underlay; Foam thickness; Needle size | Test swatches; adjust gradually; verify compatibility with foam and stabilizers; document results. |
| Stabilizers & foam | Stabilizers prevent fabric stretch/shifting; foam adds height; various stabilizers (tear-away, cut-away, temp/water-soluble) | Choose stabilizer by fabric; align foam with design; test different foam thicknesses. |
| Hoop & fabric | Hooping reduces distortion; fabric type matters; hoop tension is critical | Lay fabric flat; hoop gently yet securely; place 3D elements away from edges where possible. |
| Practical workflow | Prototype first; calibrate tension/density on scraps; validate foam; check edge; laundering considerations | Stitch small samples; adjust based on results; keep a running record of settings. |
| Design & software | Design spacing/edge definitions; layering strategy; simulation/preview; color management | Use software previews; plan multi-layered approach; test color/thread combinations. |
| Troubleshooting | Puffy/loose areas; distortion after washing; skipped/broken stitches; wavy edges | Adjust top tension near foam edges; reassess foam/stabilizer; verify needle; reseat foam. |
| Maintenance | Settings may drift over time; recalibrate frequently; keep a settings notebook | Regular test swatches; document changes; recalibrate after fabric/foam changes. |