
3D embroidered patches bring a tangible, premium feel to branding on apparel, instantly catching the eye with raised texture. From sports teams to fashion brands, patches with raised stitching offer durability, depth, and legibility that flat designs cannot match. This guide highlights patch design ideas that balance bold silhouettes with careful thread choices and considers badge concepts for different fabrics. Understanding production considerations like backing options, edge finishes, and thread choices helps preserve puff height and durability across washes. Whether you’re prototyping a logo or launching a collection, these textured patches offer premium branding without sacrificing wearability.
In other terms, this concept can be described as three-dimensional sewn patches, raised embroidery accents, or puff-style embellishments. The core idea is layering stitches to create tactile depth that remains legible on a variety of fabrics. These textile insignias function as durable identifiers for teams, brands, or events, and they align with badge design ideas as well as backing options and edge finishes. Framing the design with related descriptors—elevated thread patches, dimensional embroidery, and textured emblems—helps connect creative intent with production realities. For content creators and buyers alike, using varied terminology improves reach when mapping ideas to suppliers and production schedules.
Understanding 3D Embroidery in Patches
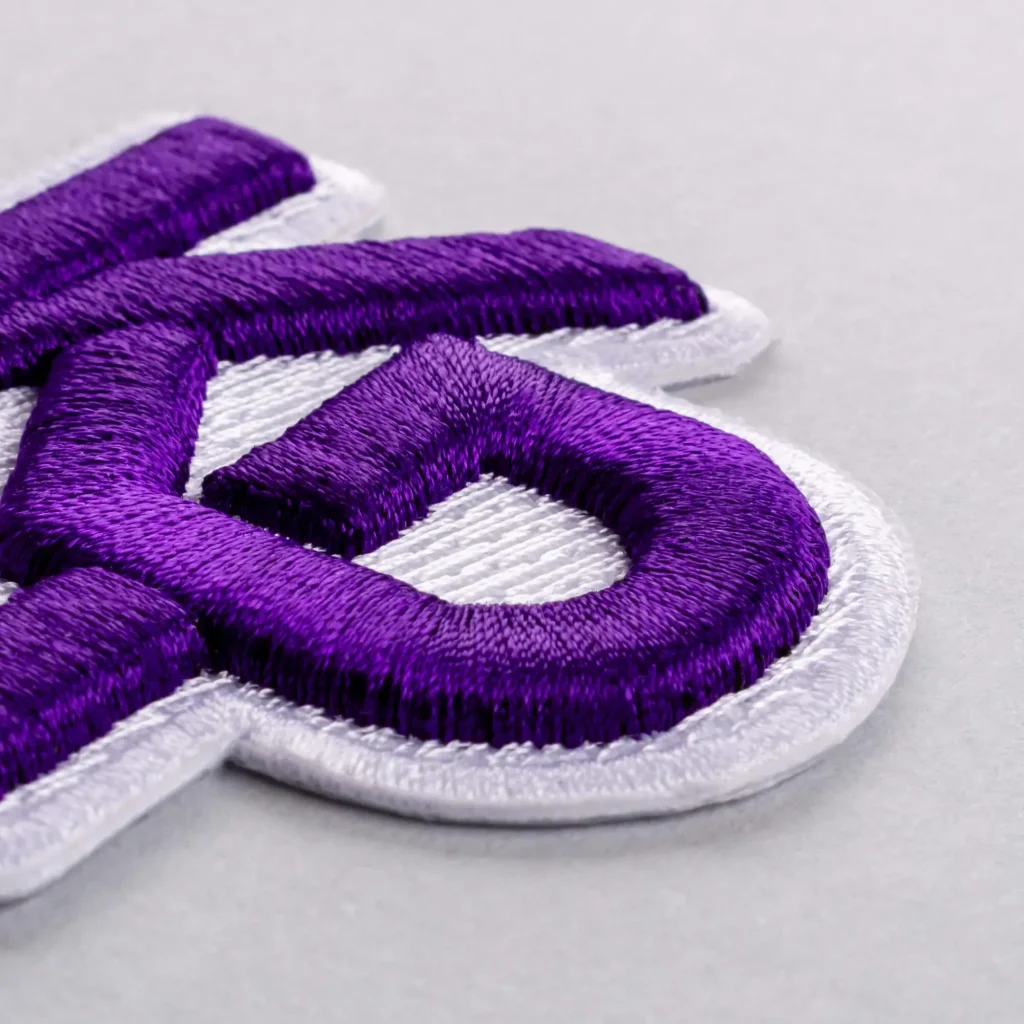
3D embroidery, often referred to as puff embroidery, creates raised elements by stacking stitches on a backing to push certain areas above the surface. This technique adds noticeable depth and shadow, making a patch feel tactile and visually dynamic on fabric. When planning a patch, designers should decide which motifs should be elevated and how colors interact across different heights to maximize legibility and impact on day-one wear.
For those exploring custom embroidered patches, understanding the basics of 3D embroidery helps translate brand stories into texture. Beginning with a simple logo or symbol allows you to test stitch height, density, and backing compatibility before expanding to more complex designs. The result is a patch that stands out on jackets, hats, or bags while maintaining durability through repeated wear and washing.
Materials, Backing, and Quality Considerations for Custom Embroidered Patches
Backings and base materials are the unsung heroes of patch quality. Typically, patches use twill or felt as the base, with embroidery threads in polyester or rayon. For 3D patches, foam backing or a soft foam substitute creates the puff effect, influencing thickness, feel, and washing behavior. Choosing fabric compatibility—denim, cotton, leather, or synthetics—ensures stitches sit correctly and backing supports longevity.
Backing options matter for end-use and care. Foam-backed patches deliver the classic puff but can be less durable in high-wash contexts, while foamless 3D designs achieve height through stitch layering alone. Iron-on vs sew-on backings offer trade-offs between convenience and durability, so aligning backing with intended application is a key patch manufacturing tip to ensure performance across seasons and wear scenarios.
Design Ideas for Embroidered Patches: Shapes, Colors, and Readability
Shape plays a pivotal role in how a patch communicates at a glance. Circular, shield, and badge-like silhouettes are traditional and versatile, but irregular shapes can be striking if they frame the main motif while preserving legibility. A bold outer edge—often merrowed—helps maintain definition on textured fabrics, and puff embroidery benefits from clear outlines to prevent details from becoming muddled as stitch height changes.
Color strategy is essential for embroidery. Limiting the palette to three to five colors supports readability at small sizes, while strategic shading creates depth without relying on digital gradients. When planning embroidered patch design ideas, balance contrast with brand colors, and consider how color blocks work with the raised elements to deliver a cohesive, enduring look on apparel and accessories.
3D Embroidered Patches: Badge Design Ideas and Brand Impact
3D embroidered patches bring tangible presence to badges, enhancing brand identity on jackets, hats, backpacks, and uniforms. The raised elements draw attention to logos, numbers, and slogans with a tactile punch that flat patches cannot match. For teams, clubs, or corporate events, 3D patches translate a story into texture, adding a premium feel that reinforces recognition and loyalty.
When exploring badge design ideas, combine mascots or symbols with concise wordmarks to maximize legibility across fabrics and sizes. A well-balanced mix of foreground elevation and subtle background shading can emphasize the core motif while keeping supporting text readable. These design decisions help ensure the badge remains recognizable from a distance and keeps its identity intact through years of wear.
From Vector Art to Finished Patch: The Production Workflow and Patch Manufacturing Tips
A successful patch starts with crisp vector art to ensure embroidery translates predictably into stitches. The typical workflow includes concept sketching, vector tracing, digitizing, and careful thread selection to establish colorways that align with a brand. Clear communication with your manufacturer about stitch types, densities, underlays, and backing will streamline production and reduce the chance of surprises in the final product.
Digitizing is where design ideas become stitch definitions, determining how tall elements rise and how layers stack for depth. Testing prototypes or samples lets you verify puff height, edge density, and color accuracy before full-scale production. This approach—often called a practical patch manufacturing tip—helps managers control costs while delivering consistent quality across batches.
Durability and Care for Long-Lasting Patches: Maintenance and Washing Guidance
Durability is a defining factor for patches, particularly 3D embroidery that relies on backing and thread integrity through repeated wear. Patches should withstand regular washing and sunlight exposure without significant fading or edge fraying. Providing clear care instructions—such as washing inside out on a gentle cycle and avoiding high heat—helps end users preserve color and puff height over time.
For high-wear items, sewn-on backings with reinforced borders often outperform iron-on options. End users benefit from guidance on when to choose sew-on for durability and how to store or launder patches to minimize deformation. By combining quality materials with thoughtful care instructions, brands can maintain the premium look and tactile appeal that custom embroidered patches convey.
Frequently Asked Questions
What are 3D embroidered patches and why should you choose them for custom embroidered patches?
3D embroidered patches (often called puff embroidery) feature raised stitches that create depth and texture on fabric. They stand out more than flat patches, making branding on apparel, bags, and gear more visible. When designing custom embroidered patches, plan which elements should rise, keep contrast high, and limit the color palette for readability.
What embroidered patch design ideas work best for 3D embroidery patches?
Focus on a strong focal element with a simple background to let the puff stitches pop. Use bold outlines and limited colors (3–5) for legibility at small sizes, and consider badge design ideas like mascots with year or slogans to reinforce identity. Shapes such as circles, shields, or badges frame the motif well and support the 3D effect.
What patch manufacturing tips should guide the production of 3D embroidered patches?
Key patch manufacturing tips include selecting foam-backed or foamless backing to create height, choosing iron-on or sew-on options based on wear, and setting a merrow edge that matches stitch density. Also consider fabric type (denim, cotton, leather) as it affects adhesion and durability.
How should you approach shape, color, and outline in 3D embroidery patches, and what badge design ideas help?
Choose shapes that complement the design; circular, shield, and badge silhouettes work well for readability and brand recognition. Use a bold outline and a restrained color palette (3–5 colors) to maintain contrast across heights, and apply badge design ideas like combining a mascot with a year or a concise wordmark.
What is the typical production workflow for turning vector art into finished 3D patches?
Start with crisp vector art, then trace and digitize to create stitch definitions, add underlays, and select thread colors. The workflow from vector art to embroidery ensures predictable stitch paths for the puff height and overall look.
How can you care for and wash 3D embroidered patches to maximize their durability?
Provide end-user care instructions and choose backing suitable for washing. For high-wear items, sew-on backing with reinforced borders performs best; wash gently, inside-out, and avoid high heat to preserve texture and color.
| Aspect | Key Points |
|---|---|
| Understanding 3D embroidery | 3D embroidery (puff) creates raised elements by stacking stitches with backing to push areas above the surface. It adds depth and shadow. Plan which elements should be raised vs. flat; a single patch can have multiple heights. Start with a simple logo to learn stitch behavior. |
| Design principles for 3D embroidered patches | Balance and a clear focal point. Use color contrast to guide the eye. Use subtle thread shading to simulate depth. Limit the palette (3–5 colors) for legibility. Typical patch height guideline: 25–30 mm; larger patches allow more detail but need more backing and stitches. |
| Shapes and outlines | Shapes should complement the design (circular, shield, badge-like; irregular shapes can work). Merrowed edges should match inner stitch density. Bold outlines help definition on textured fabrics and reinforce brand identity. |
| Materials and backing options | Base materials are usually twill or felt; threads are polyester or rayon. For 3D patches, foam backing or soft foam substitutes create the puff. Foam backing affects thickness and care. Consider fabric type (denim, cotton, leather, synthetics) due to interactions with adhesives, backing, and stitches. |
| Backing types to consider | Foam-backed patches provide the puff effect and comfort. Foamless 3D patches achieve height with stitch layering. Iron-on vs sew-on: iron-on is convenient but less durable; sew-on is more durable for high-wear uses. |
| Attachment methods and care | Iron-on is quick for demos; sewn patches offer longer durability. For regular laundering, a sew-on backing with reinforced border is advisable. Provide end-user care instructions to maintain color and texture. |
| From vector art to embroidery: the design process | Start with crisp vector art. Workflow: concept/sketch → vector tracing → digitizing → thread selection, choosing colors that align with your brand. |
| Stitch types and layering | Satin stitches define edges; fill stitches create solid color pools. Use a light underlay to anchor stitches, then build main fill with appropriate density. Layering—lighter background color, deeper foreground hue—helps simulate depth. |
| Color strategy and lighting effects | Choose high contrast between foreground and background for readability. Limit the palette to 3–5 colors. Rely on thread shading and color blocking rather than gradients, which don’t translate well to embroidery. |
| Size, shape, and placement considerations | Larger patches allow more detail; smaller patches require clean edges and legibility. Shape should frame the theme well. Circular/shield shapes suit apparel; rectangular or custom silhouettes fit hats/bags. |
| Branding, applications, and design ideas | 3D patches enhance brand presence on jackets, hats, backpacks, uniforms, or event swag. For teams, emphasize logos, numbers, and slogans. For brands, combine mascot with year or concise wordmark for legibility. |
| Production tips and cost considerations | Budget for digitizing/setup and per-patch stitching costs that scale with size and stitch count. Small patches are cheaper per unit but may need higher precision; larger patches need more thread and backing. Discuss foam backing, merrow edge thickness, and care with your manufacturer. |
| Durability, care, and cleaning guidance | Patches should withstand washing and wear. Ensure backing and threads tolerate repeated cycles. Provide care instructions (wash inside out, gentle cycle, low heat). For heavy use, sewn-on backing with reinforced border is often best. |
| Trends and future directions | Metallic threads, reflective details, and glow-in-the-dark options add shimmer and visibility. Multi‑piece patches with varied textures provide tactile interest. Balance novelty with readability and durability. |
| Checklist before production | Finalize vector art; confirm shape/size; choose backing type; decide merrow edge thickness and thread palette; request a physical prototype; provide care instructions and test washability. |
| Timeline and budgeting | Plan digitizing, proofing, and production lead times. Complex 3D designs incur higher costs but offer long-term durability and brand impact. Plan to ensure consistency across batches. |
Summary
Conclusion