
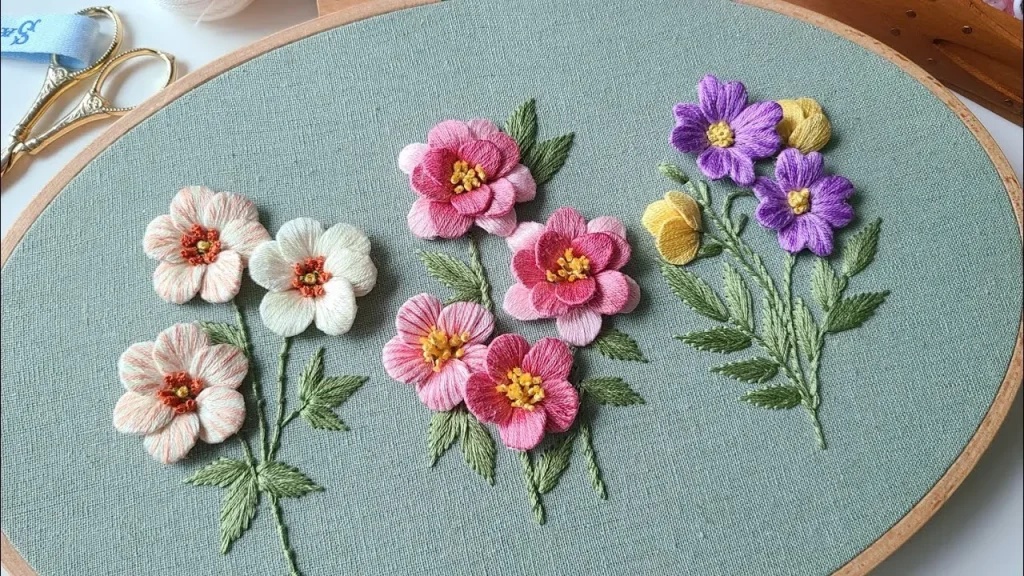
3D embroidered flowers bring a new dimension to textile art, turning flat fabrics into delicate, dimensional blooms. This beginner-friendly guide focuses on lifted stitchwork and layered embroidery to build height, texture, and soft shadows. By mastering a few accessible stitches and broad color blending, you can craft petals that seem to float above the fabric. If you’re new to 3D embroidery, this beginner embroidery guide will walk you from simple stitches to more complex, three-dimensional designs. This article also offers a starter project and stitching tips for 3D flowers to practice lift and layer techniques.
Alternatively, you can think of these sculpted fabric blooms as three-dimensional textile flowers that add tactile interest to garments, accessories, and home décor. Practitioners build volume with raised stitches, layering petals, and subtle shading to simulate natural petals without bulk. This approach aligns with broader 3D stitching techniques and beginner-friendly embroidery projects that emphasize texture over complexity. By framing the craft as layered petal construction, dimensional appliqué, or sculpted fabric blossoms, you tap into a wide range of related terms while staying true to your technique. Whether you’re transferring patterns to fabric or embellishing clothing with plush, tactile blossoms, the core ideas—lift, layer, and color blending—remain the same.
3D Embroidered Flowers: A Beginner-Friendly Guide to Lifted Stitchwork
3D embroidered flowers open up a world of tactile texture and visual depth for beginners and seasoned stitchers alike. By focusing on lifted stitchwork, you can create petals that rise from the fabric, casting natural shadows that bring your floral designs to life. This approach fits neatly into the realm of beginner embroidery, offering clear steps, simple stitches, and rewarding results as you build confidence with layered embroidery techniques.
Starting with a simple, well-planned design helps you practice the core skills without feeling overwhelmed. Lifted stitchwork pairs nicely with satin stitches and light couching to form dimensional petals, while layering adds successive planes of color and form. With regular practice, you’ll see your ability to control tension, manage fabric backing, and craft convincing depth improve steadily, even on a small project.
Mastering Lifted Stitchwork: Techniques for Depth and Shadow
Lifted stitchwork is the heartbeat of 3D embroidery, turning flat fabric into blooms that seem to float. By elevating tiny segments of thread or fabric above the base layer, you create ridges and curves that mimic natural petals. This section focuses on balancing secure anchoring with gentle elevation, so your stitches hold shape without warping the surface, a crucial skill for beginners and experienced stitchers alike.
Combine simple stitches—satin, stem, and backstitch—with small overlays or couching to build the 3D effect. Layering is essential: add petals in stages, offsetting each layer to enhance dimensionality. Practicing these steps helps you develop a keen eye for shading and light, which makes your 3D embroidered flowers appear more lifelike and ready for project surfaces such as clothing, accessories, or home decor.
Materials that Make 3D Embroidery Easier: Tools, Threads, and Stabilizers
Choosing the right materials is foundational for successful 3D embroidery. For lifted stitchwork, start with stable fabrics like cotton or linen and a suitable stabilizer to prevent puckering during layering. A curated palette of embroidery floss or stranded cotton, plus occasional metallic or rayon highlights, gives you room to blend colors for gentle shading—an important aspect of layered embroidery.
Investing in a comfortable hoop, sharp embroidery needles, and precise scissors will streamline your workflow. Padding or light fusible interfacing can add volume to petals without bulk, making the lift easier for beginners. As you expand into more complex 3D designs, you’ll appreciate how the right materials support smooth stitching, tidy backs, and durable, professional-looking results.
A Step-by-Step Starter Project for Layered 3D Flowers
Begin with a small, simple flower to practice the core lifted techniques. Outline or trace a basic petal arrangement on fabric, secure a stabilizer, and set up a light color palette for petals and centers. This starter project emphasizes planning and technique, two pillars of successful beginner embroidery that translate well into more elaborate designs.
Build the base layer with a satin fill, then introduce the first lifted layer by bringing threads up near the petal edge and allowing them to rise above the surface. Add additional lifted petals and adjust their heights to create natural curvature. Finish with a center detail—French knots or seed stitches—so the bloom feels complete. The process teaches stitching tips for 3D flowers and helps you gain confidence before tackling multi-flower compositions.
Troubleshooting Common 3D Flower Embroidery Challenges
Flat-looking petals, uneven tension, or frayed edges are common early hurdles when practicing lifted stitchwork. Start by checking fabric tension in the hoop and ensuring the lifted segments truly sit above the base layer. Small adjustments in stitch length, spacing, and thread weight can dramatically improve the dimensional effect, especially for beginners exploring layered embroidery.
If shading appears abrupt, practice smoother color transitions on scrap fabric before applying them to your final piece. Stabilize the back to reduce snagging and keep the stitch lines clean. By testing different stitches and layering orders, you’ll build a more forgiving workflow that yields consistent results across multiple flowers.
Expanding Your 3D Embroidery Repertoire with Layered Flower Designs
Once you’ve mastered a single 3D flower, you can expand into bouquets, vines, and multi-petal arrangements. Layered embroidery lets you control depth by offsetting petals and centers, enabling more complex compositions while maintaining lifted dimension. This growth aligns with the broader goals of beginner embroidery: steady progress, repeatable technique, and creative experimentation.
Experiment with different stitches for texture and veining, such as chain stitches for delicate petal veining or lazy daisies for highlighted centers. By integrating “3D embroidery techniques” and “stitching tips for 3D flowers” into your practice, you’ll build a versatile toolkit for future projects—from accessories to wall art—that showcases lifted stitchwork, color blending, and careful planning.
Frequently Asked Questions
What makes 3D embroidered flowers stand out, and how does lifted stitchwork contribute to depth?
Lifted stitchwork raises portions of threads above the base fabric, giving 3D embroidered flowers their height and soft shadows. This is a core element of 3D embroidery techniques. Start with a smooth base, build a satin-stitch foundation, then add lifted layers with slightly lighter colors to simulate petal curvature, using a stabilizer and even tension for clean, dimensional results.
For a beginner in embroidery, which techniques are best for creating 3D embroidered flowers?
Begin with simple base petals using satin stitch, stem stitch, and backstitch for outlines. Then introduce lifted stitchwork to create the 3D effect and layer gradually. Practice on scrap fabric to master even tension before working on a final piece.
How does layered embroidery enhance dimension in 3D embroidered flowers?
Layered embroidery adds depth by stacking multiple petal layers, each offset to mimic natural blooms. Build from a base layer, then add successive lifted layers with subtle color shifts to create realistic shading and volume.
What are practical stitching tips for 3D flowers to ensure petals lift and layer well?
Maintain consistent tension and secure lifted sections. Ensure lifted petals truly sit above the base, not flush with it, and use backing or stabilizer to prevent fraying. Test stitch lengths and color transitions on scrap fabric to blend layers smoothly.
Which materials and tools are essential for a beginner tackling 3D embroidered flowers?
You’ll need a smooth base fabric with stabilizer, a small color palette of embroidery floss, appropriate needles, an embroidery hoop, scissors, and pins. Start with cotton floss in a few shades and consider light padding to help lift layers without bulk.
What is a simple step-by-step plan to start a small 3D embroidered flowers project using lifted stitchwork?
Plan a small, simple flower design and secure the fabric with stabilizer in an embroidery hoop. Create a base layer with satin stitches, then add a first lifted layer using a lighter shade. Build additional lifted petals, add subtle shading with darker tones, finish the center with French knots or seed stitches, then secure ends and remove the hoop.
| Topic | Key Points |
|---|---|
| Introduction | 3D embroidered flowers transform flat fabric into dimensional blooms using lifted stitchwork; this beginner guide outlines a path from basic concepts to layered designs, with practical tips and simple stitches to build a solid foundation. |
| What Are 3D Embroidered Flowers? | Petals and centers are built in layers, with threads elevated above the base fabric to create depth; used to decorate clothing, accessories, home decor, or art; techniques range from basic satin stitches to advanced layering. |
| Lifted Stitchwork: Core of Depth | Lifted stitchwork raises portions of stitches or uses hollow centers and overlays to form volume, creating petal curvature and soft shadows; combines simple stitches (satin, stem, backstitch) with overlays for a convincing 3D effect. |
| Starting with the Right Mindset | Plan carefully with a simple design on a stable fabric; use stabilizers if needed; practice on scrap fabric to refine technique; maintain calm, consistent tension, and tidy finishes for a professional result. |
| Tools and Materials | Smooth base fabric and stabilizer, a selection of threads ( floss, metallic, rayon), appropriate needles, hoop or frame, scissors and pins, plus optional light padding for extra volume. |
| Choosing the Right Materials | Start with cotton embroidery floss in a few colors; choose a light, medium, and dark shade palette for shading; thicker threads or light padding can add lift, but avoid stiffness. |
| Techniques You’ll Use | Satin and long satin stitches for petal bases; stem and backstitch for outlines/shading; lifted stitches with overlays; layering multiple petals; finishing touches like French knots or seed stitches for the center. |
| Step-by-Step: A Beginner Project | Plan and prepare; create a base satin layer; build the first lifted layer; add more lifted petals with slight rotation; define shading; craft the center; finish and secure; troubleshoot and expand to more designs. |
| Tips and Tricks for Consistent Results | Maintain consistent tension; stabilize the back; practice color transitions; plan design around fabric grain; take breaks to sustain accuracy. |
| Why 3D Embroidered Flowers Work for Beginners | They offer quick, tangible progress through lifted stitches and simple layering, translating to a wide range of projects from garments to decor and building confidence for more complex floral work. |
| Incorporating Related Keywords | Incorporate terms like beginner embroidery, 3D embroidery techniques, lifted stitchwork, and layered embroidery to describe your process and boost search visibility. |
Summary
3D embroidered flowers invite you into a tactile world where fabric becomes sculptural. By embracing lifted stitchwork and deliberate layering, you transform simple petals into dimensional blooms that cast subtle shadows and invite touch. This descriptive conclusion highlights steady practice, thoughtful planning, and an openness to color and texture, encouraging you to grow from a single 3D embroidered flower to lush bouquets and decorative accents that brighten clothing, accessories, and home decor. With each stitch, your confidence deepens as you master lift, layering, and nuanced shading that make 3D embroidery truly come alive.