
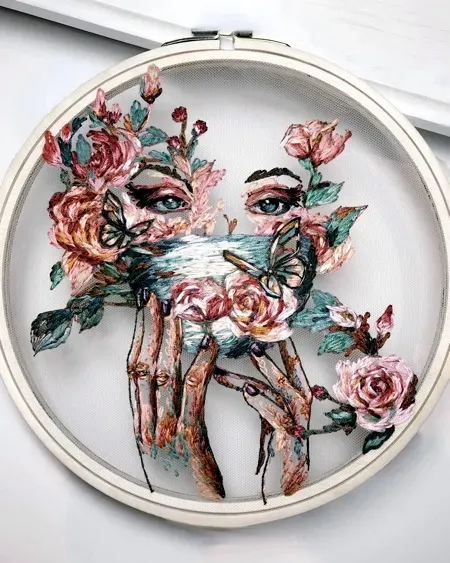
Discover how 3D embroidered art transforms a simple sketch into a tactile sculpture that invites touch and close inspection. This SEO-friendly introduction blends creativity with technique, guiding you from initial ideas through a design to stitch guide that keeps you organized. By weaving together 3D embroidery techniques and practical steps, you will learn to turn sketches into embroidery that gains depth. The approach suits both hobbyists and professionals, with tips that ease the transition from embroidery from sketches to a living textile sculpture. With concise, actionable insights and inspiration, this 3D embroidered art tutorial lays the groundwork for your evolving project.
In this companion section, explore how textile sculpture emerges from drawing concepts, translating flat sketches into multi-layered stitches and forms. The discussion reframes the process as turning drafts into dimensional embroidery, a clear sequential pathway that aligns planning, materials, and stitch strategy. The emphasis shifts from line work to volume and tactility, using padding, layering, and texture to evoke depth. Beyond the craft itself, this approach supports design thinking and visual storytelling as you map sketches to finished fabric sculpture. Whether you’re new to the craft or seeking a repeatable system, this guide helps you advance from drafts to three-dimensional textile art.
From Sketch to 3D embroidered art: A Design-to-Stitch Journey
Turning a simple sketch into a 3D embroidered art piece starts with a clear vision and a practical plan. By treating your drawing as a blueprint for stitch placement, you begin the journey from sketch to sculpture, layering threads and padding to build volume. This approach makes the concept tangible and primes you to turn sketches into embroidery with confidence.
A deliberate design-to-stitch workflow helps you map where height will live, how light will reveal volume, and which stitches will define edges. When you translate your lines into a stitch map, you’re essentially turning sketches into embroidery and moving toward a finished, dimensional piece.
Mastering 3D Embroidery Techniques for Depth and Texture
3D embroidery techniques offer a toolbox for depth: padding under petals, layered fills for shading, couching for bulk, and occasional needle felting accents. Each technique adds a tactile layer that makes the sculpture feel alive as you view it from different angles.
Experimenting with these techniques in combination lets you sculpt form, control light, and create textured surfaces that catch the eye. The right mix of padding, stitches, and surface variation is what makes a flat fabric behave like a mini sculpture.
From Sketch to Stitch: Turning Drawings into a Clear Plan
From Sketch to Stitch: Analyze your drawing for structure, weight, and layering. Look for distinct planes, negative space, and areas where height will live, so you can plan the stitching accordingly. If you’re approaching embroidery from sketches, this analysis serves as your first mapping step.
Create a simple stitch map or digital outline to guide transfer and stabilization. A well-defined plan becomes a design to stitch guide that keeps you consistent as you build up layers and textures.
Design to Stitch Guide: Materials, Stabilizers, and Tools for Success
Materials, Stabilizers, and Tools anchor a reliable design-to-stitch process. Choose a fabric base with enough body, select cut-away or tear-away stabilizers appropriate for the technique, and gather a range of threads and padding options to support multi-layer work.
Test materials on a scrap swatch before committing to the final piece. This practice helps you tune tension, compatibility, and padding behavior, reducing surprises at the sewing machine.
Layering for Lift: Building Depth with Padding, Layering, and Color
Layering and color are the engines of depth. Establish a layer hierarchy where base shapes sit on the foundation, mid-layers add texture, and high-relief details crown the design with lift. Padding and careful stitch choice help these layers read as a cohesive sculpture.
Plan color strategy in advance: map palettes to regions, use shading to suggest light, and vary thread weights for subtle contrast. Testing color combinations on a small sample ensures hues translate accurately to fabric and thread under real stitching conditions.
From Sketch to Finished Piece: A Practical 3D embroidered art tutorial
From Sketch to Finished Piece: A practical 3D embroidered art tutorial that walks through concept refinement, stitch planning, transfer, layering, and finishing. Start by refining the core shapes and deciding where height will live, then outline a stepwise production plan that guides you from outline to texture.
In real projects, you’ll adjust padding thickness, layering order, and stitch choices to realize your textile sculpture. Finish with trimming, securing knots, and evaluating the piece from multiple angles so it invites touch and rewards close viewing.
Frequently Asked Questions
What are essential 3D embroidery techniques to add depth in 3D embroidered art?
Key 3D embroidery techniques include padding stitches to raise areas, layered fills (satin and long‑and‑short stitches) to build form, couching thicker threads for bulk, needle felting accents for micro‑texture, and selective bead accents for highlights. Together, these techniques create relief, dimension, and tactile interest in 3D embroidered art.
How can you turn sketches into embroidery to start a 3D embroidered art project?
To turn sketches into embroidery, start by analyzing the drawing for structure and layering. Create a simple stitch plan that defines which elements sit on the base, which are mid‑layers, and where height is added with padding. Scan or photograph the sketch, adjust contrast, and transfer clear outlines to fabric with stabilizers. Then follow a design‑to‑stitch workflow to guide your stitching from outline to texture.
What does embroidery from sketches involve when planning a 3D embroidered art piece?
Embroidery from sketches involves translating line work and shapes into stitches, textures, and layered forms. Plan a layer hierarchy, choose appropriate stitches, map padding for dimension, and establish a color plan to achieve depth. This approach helps ensure your finished 3D embroidered art piece reflects the original sketch’s intent.
How does a design to stitch guide help convert a sketch into a 3D embroidered art piece?
A design to stitch guide provides a practical workflow that maps each design element to specific stitches, layers, and materials. It helps organize outlines, fills, textures, and padding, so a sketch becomes a cohesive 3D embroidered art piece with clear steps and material decisions.
Are there beginner-friendly steps from a sketch to a finished 3D embroidered art tutorial?
Yes. A beginner‑friendly path in a 3D embroidered art tutorial covers concept refinement, stitch planning, color and thread selection, transfer and stabilization, layering order, padding, finishing, and testing on scraps before final stitching. This structured approach helps you turn sketches into expressive textile sculpture.
What are common challenges when turning sketches into embroidery for 3D embroidered art, and how can a solid workflow mitigate them?
Common challenges include tension and fabric puckering, thread fraying, height discrepancies between layers, and color bleed. A solid design to stitch guide or workflow helps you plan layer order, padding, and color transitions, test on scraps, and adjust tension and materials, reducing distortion and ensuring cohesive 3D embroidered art.
| Key Point | Summary |
|---|---|
| What makes 3D embroidered art special | Adds depth, texture, and form using layered stitches, padding, and inventive thread applications to create a tactile, sculptural piece that invites touch. |
| Sketch to Plan | Treats sketches as blueprints; analyze structure, weight, and layering, then digitize and outline to guide a consistent stitch plan. |
| Planning concepts before stitching | Establish layer hierarchy, stitch order, and a materials map to organize elements and depths. |
| Materials, Tools, and Setup | Choose a stable base fabric, appropriate stabilizers, varied threads, padding, hoops/frames, and essential needles; test materials on scrap first. |
| Design-to-Stitch Workflow | A six-step framework: concept refinement, stitch planning, color planning, transfer/stabilization, layering/stitch order, and finishing touches. |
| Techniques to Build Depth | Padding stitches, layered fills, couching, needle felting accents, and selective bead accents to create range of textures and light interaction. |
| Color Strategy | Strategic color use for lighting and mood: cooler vs warmer tones, cohesive palettes, varied thread weights, and sample testing. |
| Common Challenges | Tension, puckering, fraying, height discrepancies, and color bleed; mitigate with stabilizers, proper tension, and colorfast threads. |
| Real-World Scenarios | From sketch to finished piece: base layer, mid-layers, high-relief details; use padding and gradients, couching for stems, and subtle beadwork. |
| Conclusion (from Content) | Turning sketches into embroidery blends planning with sewing, using a design‑to‑stitch workflow and material strategies to produce expressive 3D embroidered art. |
Summary
Conclusion: A Pathway from Sketch to Stitch – 3D embroidered art invites viewers to touch and experience depth, texture, and form born from careful stitching. Through a clear design-to-stitch workflow, thoughtful materials planning, and technique variation, this craft transforms two-dimensional sketches into living textile sculptures that engage the eye and the hand. As you practice, your pieces will gain nuance in depth, balance, and expression, turning simple drawings into compelling 3D embroidered art that communicates a story through stitch, texture, and form.